“Painting with Light” is an exploration of the art and craft of cinematography, drawing from the rich experience and techniques of Hollywood’s golden age. This book takes you on a journey through motion picture photography, from the bustling sound stages of Hollywood to the challenging environments of outdoor locations, and from the technical intricacies of the film laboratory to the psychological nuances of visual perception.
A significant portion is dedicated to the art of the close-up, that intimate connection between camera and subject that can make or break a performance. We then venture outdoors, tackling the unpredictable nature of exterior cinematography, from sun-drenched landscapes to snow-covered vistas.
Throughout, this work emphasizes the cinematographer’s role as an artist, painting with light to create compelling visual narratives. It is both a technical manual and an inspirational guide, designed to elevate the reader’s understanding and appreciation of the cinematographic art form.
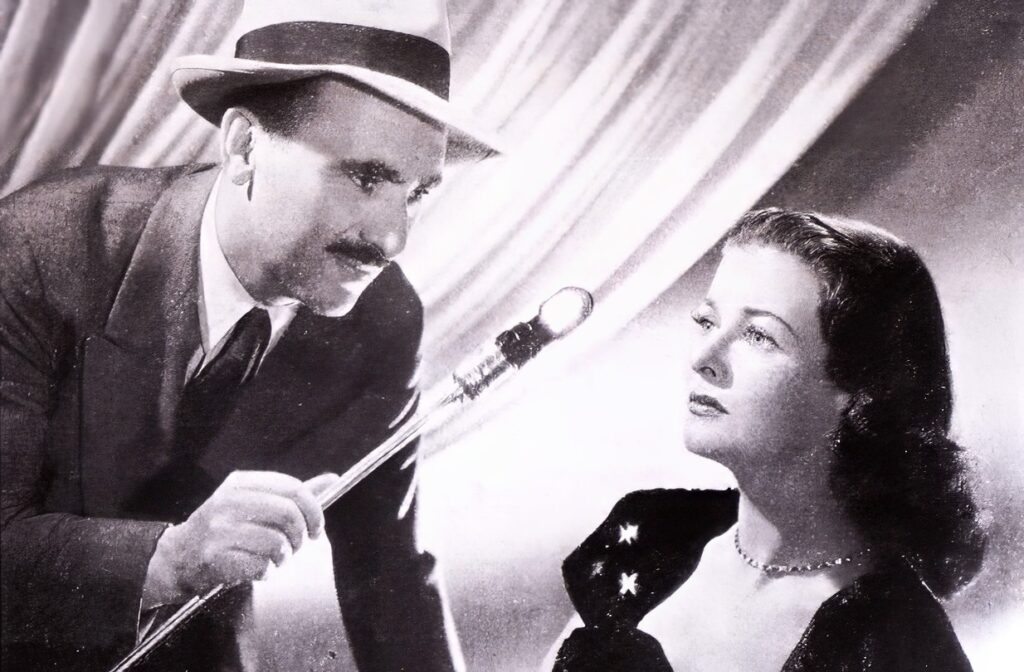
Table of Contents
Chapter 1: Hollywood Photography
The City of Geniuses
Hollywood, the dream factory of the world, is a city teeming with directors of all kinds. From the moment you step foot in this cinematic wonderland, you’re greeted by the first director – the traffic director at the studio gate. He holds the keys to this kingdom of celluloid dreams, quite literally. As you venture further, you’ll encounter a parade of directors: First Assistant, Second Assistant, Art, Musical, Dialogue, Process, Sound, and even the enigmatic In-Director. But among this constellation of creative minds, one star shines brightest for our purposes – the Director of Photography. This maestro of light and shadow is the true painter of dreams on the silver screen.
The Photographic Staff
The creation of a motion picture is a symphony of talents, each playing their part in perfect harmony. At the heart of this visual orchestra is the photographic staff, a group of skilled artists and technicians working under the baton of the Director of Photography. This crew is divided into specialized departments, each with its unique function. From the camera crew who capture the images, to the electrical crew who sculpt with light, to the grip department who provide the canvas on which this art unfolds – each plays a crucial role. The process department, special effects team, green department, and many others contribute their expertise to create the magic we see on screen. It’s a delicate dance of creativity and technical precision, all orchestrated by the Director of Photography.
The Outstanding Stand-ins
In the grand theatre of film production, there exists an unsung group of performers who play a vital role behind the scenes – the stand-ins. These remarkable individuals are the unsung heroes of the set, possessing an uncanny resemblance to the stars they represent. Their job is to stand in place of the actors during the painstaking process of lighting and camera setup. This allows the stars to conserve their energy and prepare for their performances while the technical aspects of the shot are perfected. The best stand-ins are more than just physical doubles; they embody the essence of the character, mimicking mannerisms and movements with precision. It’s a testament to their skill that some stand-ins have gone on to become stars in their own right, stepping out of the shadows and into the spotlight.
The Laboratory Contact Man
In the intricate dance of filmmaking, the laboratory contact man serves as a crucial liaison between the set and the developing room. This unsung hero ensures that the Director of Photography’s vision is faithfully translated from the camera negative to the final print. With an intimate understanding of both the artistic intentions and the technical processes involved, the contact man acts as the guardian of the image quality. He meticulously oversees the developing, timing, and printing processes, making sure that every nuance of light and shadow captured on set is preserved in the final product. In essence, he is the keeper of the flame, ensuring that the visual story crafted by the cinematographer reaches the screen in all its intended glory.
Tools of Motion Picture Photography
The art of cinematography is as much about technical mastery as it is about creative vision. The tools of this trade are the brushes with which the Director of Photography paints his light pictures. At the heart of it all is the camera, a mechanical marvel that captures fleeting moments and preserves them for eternity. But a camera alone does not make a cinematographer. The arsenal includes a variety of lenses, each offering a unique perspective on the world. Filters allow for subtle manipulation of light and color, while exposure meters ensure precise control over the image. The number slate, once a simple board, has evolved into sophisticated digital systems. Even the tripod, that humble support, comes in various forms to allow for creative camera movements. These tools, in the hands of a skilled cinematographer, become instruments of visual poetry.
The lenses most widely used are the following:
- 24mm or 25mm lens, used as a wide-angle lens
- 28mm lens, narrower in angle, but producing less distorion
- 30mm lens, used for long shots with depth
- 35mm
- 40mm lens, used for long shots
- 50mm lens, for an angle of view nearest to that of the human eye
- 75mm, 80mm, 100mm lens, for portraits, close-up, and telephoto shots


Chapter 2: Motion Picture Illumination
The Set
The set is the stage upon which our cinematic dreams unfold. In the early days of film, the world itself was our set, with filmmakers venturing out to capture stories in their natural habitats. As the industry grew, so did our ambition, and soon we were building elaborate recreations of far-off lands right in our own backyards. The advent of sound brought us indoors, transforming simple barns into the vast, echoing cathedrals of creativity we call sound stages. Here, we can control every aspect of our environment, from the play of light to the whisper of wind. A good set is more than just walls and props; it’s a living, breathing entity that supports and enhances the story we’re telling. It must be built with light in mind, offering opportunities for depth and contrast, for shadows to dance and highlights to sing.
Props
In the world of cinema, even the smallest object can tell a story. Props are not mere decorations; they are silent actors, playing crucial roles in bringing our cinematic world to life. From the delicate china in a period drama to the futuristic gadgets of science fiction, each prop is carefully chosen to enhance the narrative and the visual composition. The old belief that shiny objects photograph poorly has been dispelled by modern film technology. Today, we embrace the sparkle of polished surfaces, using them to add life and depth to our scenes. The glint of a knife, the shimmer of silk curtains, the warm glow of copper pots – these details create a rich tapestry of visual interest that draws the viewer deeper into our created world.
People
At the heart of every great film are the people who bring the story to life. As cinematographers, our job is to illuminate not just their physical forms, but their very essence. The human face is our most challenging and rewarding subject. Each wrinkle, each expression, each fleeting emotion must be captured and enhanced by our lighting. We begin with the principal artists, carefully crafting the light to flatter and reveal. But our work doesn’t stop there. We must consider the extras, the background players who give depth and context to our scenes. Even the stand-ins play a crucial role, allowing us to perfect our lighting before the stars step onto the set. In the dance of light and shadow, every face tells a story, and it’s our job to ensure that story is told in the most compelling way possible.
Rigging for Illumination
The art of lighting a set is a complex choreography of equipment and expertise. Before a single actor steps foot on the stage, a small army of technicians is hard at work, rigging the set for illumination. Suspended high above the action, platforms and scaffolding create a web of potential light sources. Each lamp, each reflector, must be precisely placed to create the desired effect. The modern set is a marvel of engineering, with movable walls and ceilings that can be adjusted to accommodate our lighting needs. As we move towards more efficient and flexible lighting setups, we’re constantly innovating, seeking new ways to paint with light while minimizing setup time and maximizing creative potential. The rigging process is where the magic begins, setting the stage for the visual symphony that will unfold.
Lighting Equipment
The tools of our trade have come a long way since the early days of mercury vapor lamps and theatrical arcs. Today’s cinematographer has at their disposal an arsenal of lighting equipment that would make those pioneers green with envy. From the powerful ‘Brute’ arc lamps that can simulate bright sunlight, to the subtle ‘inkie’ incandescent lights that add just a kiss of illumination to an actor’s eyes, each piece of equipment serves a specific purpose in our lighting palette. The Molarc, with its versatile beam spread, has become a staple for creating dramatic effects. The humble ‘broad’ provides a soft, even wash of light, while the more specialized units like the ‘Dinky-Inkie’ allow for precise control in tight spaces. Each lamp, each reflector, is a brush in our hands, allowing us to paint with light in ever more nuanced and expressive ways.


The Theory of Illumination
At its core, the art of cinematography is about understanding and manipulating light. Just as a painter must understand color theory, a cinematographer must grasp the fundamental principles of illumination. In nature, we observe how a single light source – the sun – can create an impression of depth and form through the interplay of light and shadow. In our artificial world of film lighting, we must recreate this natural phenomenon using multiple sources. The key to effective illumination lies in creating the illusion of a single, motivated light source while using additional lights to model, separate, and enhance. We must consider not just the quantity of light, but its quality – its direction, intensity, and color temperature. By mastering these elements, we can create images that not only expose properly but also evoke mood, enhance storytelling, and transport the viewer into our created world.


Chapter 3: Mystery Lighting

Fire
Fire, that primal force that has captivated humanity since time immemorial, holds a special place in the cinematographer’s toolkit. It is both a practical light source and a powerful symbol, capable of evoking warmth, danger, or mystical energy. When harnessing fire for our cinematic purposes, we must respect its dual nature – its ability to illuminate and to destroy. A campfire scene, for instance, requires careful consideration of how the flickering flames will interact with the actors’ faces and the surrounding environment. The dance of light and shadow can create a mesmerizing effect, drawing the viewer into the intimate circle of warmth. But fire is not just about warm, orange glows. The eerie blue flames of a gas fire can lend an otherworldly atmosphere to a scene, while the stark, harsh light of an explosion can convey chaos and destruction. As with all aspects of cinematography, the key is to understand the nature of your light source and use it to enhance the story you’re telling.
Sets and Mystery
The creation of mystery in cinema is as much about what we don’t show as what we do. A well-designed set can be a powerful tool in building atmosphere and tension. Shadows become as important as light, negative space as crucial as the visible elements. When lighting for mystery, we often find ourselves breaking the rules of conventional illumination. Instead of evenly lit spaces, we create pockets of darkness where danger – real or imagined – might lurk. Low-key lighting becomes our ally, allowing us to sculpt the set with shadow and selective illumination. Consider the classic film noir settings – dimly lit alleyways, smoky bars, rain-slicked streets. These environments are characters in themselves, their mood established through careful manipulation of light and shadow. The key is to give the audience just enough information to spark their imagination, allowing the power of suggestion to do the rest.
Lighting for Lightning
Lightning is nature’s own dramatic lighting effect, and recreating it for the screen requires both technical skill and artistic finesse. The challenge lies in capturing the sudden, intense burst of light and the deep shadows it casts, all while maintaining the illusion of reality. In the studio, we employ specialized lightning machines – from the old-school ‘barrel of salt water’ method to modern banks of high-intensity flash units. The key to convincing lightning effects is in the timing and direction of the light. It should feel random, yet purposeful, illuminating the scene in brief, stark flashes that reveal as much as they conceal. When used as a light source, lightning should never come from the front – this would result in a flat, uninteresting image. Instead, we use it as a dramatic backlight or crosslight, creating stark silhouettes and long, ominous shadows. Remember, lightning is not just about the flash – it’s about the anticipation before and the lingering darkness after.
Lighting a Campfire Scene
The campfire scene is a staple of storytelling, offering a natural focal point for characters to gather and reveal their innermost thoughts. From a lighting perspective, it presents both challenges and opportunities. The fire itself becomes our primary light source, casting a warm, flickering glow that dances across faces and creates deep, moving shadows. To recreate this effect, we often use a combination of techniques. Arc lights placed behind the fire pit provide the intense, directional light of the flames, while softer, amber-gelled lights hidden among the actors create the illusion of reflected firelight. The key is to maintain the feeling of a single, central light source while providing enough illumination for the camera to capture the necessary detail. Remember to consider the surrounding environment as well – a hint of moonlight rimming the trees or a distant lantern can add depth and realism to the scene.
How to Illuminate a Fireplace Scene
The fireplace has long been a symbol of home, comfort, and intimacy in cinema. Lighting such a scene requires a delicate balance between realism and cinematic enhancement. The fireplace itself should appear to be the primary source of illumination, casting a warm, flickering light that dominates the immediate area. This effect can be achieved using a combination of techniques. Small, hidden lights placed within the fireplace create the illusion of flames, while larger units with orange gels provide the overall warm glow. Flickering effects can be created using dimmers or specially designed ‘flicker boxes’. For close-ups, consider using a ‘fire effect’ – a rotating drum with holes cut in it, placed in front of a strong light source. This creates a convincing simulation of the ever-changing patterns of firelight on an actor’s face. Remember, firelight is rarely static – it ebbs and flows, creating a dynamic play of light and shadow that can greatly enhance the mood of a scene.
The Candle Flame
There’s something inherently romantic and intimate about candlelight, and recreating its soft, flickering glow for the camera is an art in itself. The challenge lies in capturing the delicate illumination of a candle while providing enough light for proper exposure. In reality, a single candle rarely provides sufficient illumination for filming, so we must employ some movie magic. One effective technique is to use a small, battery-powered light hidden within a hollow candle. This provides a consistent light source that can be easily controlled. For the flickering effect, a combination of dimmers and flags gently moved in front of auxiliary lights can create the illusion of a dancing flame. When lighting faces by candlelight, remember that the light source is typically low and close to the subject. This creates dramatic under-lighting that can be very flattering or intentionally unsettling, depending on the mood you’re aiming for. The key is subtlety – overdo the effect, and you’ll lose the delicate charm that makes candlelight so appealing.


Doubles and Their Illumination
In the world of cinema, danger is often an illusion, carefully crafted through a combination of skilled performers and clever lighting techniques. When it comes to illuminating scenes involving stunt doubles, our primary concern is maintaining the illusion while ensuring the safety of all involved. The key is to create lighting conditions that obscure the double’s features while still capturing the excitement of the action. Backlighting is our greatest ally here – by placing strong light sources behind the performer, we create a silhouette that maintains the character’s outline while hiding identifying details. For scenes where more detail is required, we might employ strong cross-lighting or top-lighting to create deep shadows that obscure facial features. The use of smoke or atmospheric haze can further soften the image, blurring the line between actor and double. Remember, the goal is not to deceive the audience entirely, but to create a seamless visual experience that supports the story without breaking the suspension of disbelief.
Criminal Lighting
The world of crime and mystery in cinema has its own unique lighting language, one that has evolved from the stark chiaroscuro of film noir to the more nuanced approaches of modern thrillers. When lighting scenes of criminal activity, our goal is often to create a sense of unease, tension, and moral ambiguity. Low-key lighting is our primary tool, with deep shadows suggesting hidden dangers and half-lit faces hinting at duplicitous natures. The classic “criminal lighting” setup often involves a strong, low-angled key light that creates dramatic shadows across the face. This under-lighting effect can make even the most innocent face appear sinister. Harsh, direct top-lighting can create deep eye sockets and exaggerate facial features, lending a gaunt, haunted look to characters. Remember, in criminal lighting, what you don’t show is often more important than what you do. Use shadows strategically to conceal and reveal, always leaving the audience wondering what might be lurking just out of sight.
The Radio Dial as a Light Source
In the realm of mystery and suspense, even the smallest light source can become a powerful tool for creating atmosphere. The soft glow of a radio dial, seemingly insignificant in daylight, can transform into a beacon of eerie illumination in a darkened room. When using such a minimal light source, every photon becomes precious. The key is to embrace the darkness and use the radio’s light as an accent, rather than trying to illuminate the entire scene. A soft glow on an actor’s face, just enough to catch the glint in their eye or the curve of their cheek, can be incredibly evocative. Consider combining this with other subtle light sources – perhaps the dying embers of a fireplace or the faint moonlight seeping through a window. The interplay of these minimal light sources can create a rich, nuanced atmosphere that draws the viewer into the world of the film. Remember, in such low-light situations, the audience’s imagination becomes your greatest ally – suggest rather than show, and let the viewers’ minds fill in the shadows.
The Power of Light
Light is more than just a tool for exposure; it is a language, a means of communication as powerful as dialogue or music. The strategic use of light can guide the audience’s attention, reveal or conceal information, and profoundly influence the emotional tone of a scene. Consider a simple scenario: a darkened room, a sliver of light beneath a door. The sudden appearance of shadows interrupting this light instantly creates tension – who’s there? What’s about to happen? Without a word spoken, we’ve engaged the audience and set the stage for drama. The power of light lies in its ability to tap into our primal instincts and subconscious associations. Bright, even illumination makes us feel safe and exposed, while darkness and shadow trigger our fear of the unknown. As cinematographers, we wield this power, using it to support and enhance the story being told. Whether it’s the harsh glare of interrogation lights, the soft glow of a romantic evening
Chapter 4: Special Illumination
Lighting the Street
The street, whether a bustling city avenue or a quiet suburban lane, presents unique challenges and opportunities for the cinematographer. Unlike controlled studio environments, street lighting must contend with the interplay of multiple light sources – streetlamps, shop windows, car headlights, and the ever-changing sky. The key to effective street lighting lies in understanding and enhancing the natural light patterns of urban environments. Start by identifying your primary light sources and work to augment them believably. For night scenes, streetlamps become our main motivating source, casting pools of light surrounded by deep shadow. Use this contrast to create depth and mood. Don’t be afraid of darkness – areas of shadow can be as important as areas of light in creating a believable street scene. For day scenes, consider the angle of the sun and how it interacts with buildings and other structures. Remember, the street is not just a backdrop – it’s a character in its own right, and your lighting should bring it to life.


Rain
Rain has a magical quality on film, transforming ordinary scenes into moody, atmospheric set pieces. However, capturing rain effectively requires more than just water falling from the sky. The key to cinematic rain is backlighting. Without proper illumination, rain can be nearly invisible on camera. By positioning strong light sources behind the falling water, we create glistening streaks that stand out against darker backgrounds. But rain isn’t just about the droplets – it’s about the environment it creates. Wet surfaces become reflective, offering opportunities for interesting light play. Use this to your advantage by positioning lights to create striking reflections on rain-slicked streets or puddles. Remember, rain affects the quality of light as well. Overcast skies create soft, diffused light that can be simulated with large silks or bounce boards. For night rain scenes, consider how streetlights would interact with the water, creating halos and streaks of light. With careful attention to these details, rain can become a powerful tool for setting mood and atmosphere in your shots.
Summer Moonlight
Moonlight presents a fascinating paradox for cinematographers. In reality, moonlight is quite dim, yet cinematic convention calls for night scenes that are clearly visible to the audience. The art lies in creating the illusion of moonlight while providing sufficient illumination for the camera. The classic approach to moonlight involves using a strong backlight or three-quarter backlight, often with a blue gel to simulate the cool tones we associate with night. This creates a silvery rim light on subjects, separating them from the background. Fill light should be minimal, allowing for deep, rich shadows that enhance the night-time mood. Consider the quality of moonlight as well – unlike harsh sunlight, moonlight creates soft, diffused shadows due to its relatively small size and great distance. Use large sources or bounce light off reflectors to achieve this softness. Remember, moonlight scenes don’t have to be entirely blue – warm practical sources like windows or streetlights can create interesting color contrasts that add depth and realism to your nighttime compositions.
Autumn Fog
Fog is a cinematographer’s dream, adding instant atmosphere and mystery to any scene. However, creating convincing fog effects requires careful consideration of both the fog itself and how it interacts with light. The key to effective fog lighting is contrast. Without light, fog is just a murky gray mass. By backlighting fog, we create depth and dimension, turning it into a dynamic, almost tangible presence on screen. Use strong, direct sources to cut through the fog, creating shafts of light that add visual interest and guide the viewer’s eye. But fog isn’t just about backlight – consider how it affects the overall quality of light in a scene. Fog diffuses and scatters light, softening shadows and creating a dreamy, ethereal quality. This can be simulated by using larger, softer light sources and reducing overall contrast. Remember that fog isn’t uniform – it swirls and eddies, creating areas of varying density. Use this to your advantage by creating layers of fog, some more opaque than others, to add depth to your compositions. With careful lighting, fog can transform an ordinary scene into something truly magical.
Wintertime
Winter light has a unique quality that can add a crisp, clean feel to your images. The low angle of the sun during winter months creates long shadows and warm, golden light that can be incredibly flattering. However, winter scenes also present challenges, particularly when dealing with snow. Snow is highly reflective and can easily become overexposed, losing detail and texture. The key is to expose for the highlights while allowing shadows to fall where they may. This creates a high-contrast image that captures the stark beauty of winter landscapes. When lighting winter scenes artificially, consider the color temperature of your sources. Cool, blue-tinted light can enhance the feeling of cold, while warmer tones can create a sense of comfort and coziness in interior scenes. Don’t forget about the unique effects of winter light – the glitter of sunlight on frost, the soft glow of light through icicles, or the harsh glare of sun on ice. These small details can add authenticity and visual interest to your winter scenes.
Dream Lighting
Dream sequences offer cinematographers a unique opportunity to break free from the constraints of realism and explore more expressive, abstract forms of lighting. The key to effective dream lighting is to create a visual distinction from the “real world” of your film. This can be achieved through a variety of techniques. Soft, diffused lighting can create a dreamy, ethereal quality, while harsh, contrasty lighting might suggest a more nightmarish atmosphere. Consider using unconventional color combinations or lighting angles that would be impossible in reality. Practical sources within the frame can be exaggerated or distorted to create surreal effects. Remember, dreams often have a fluid, shifting quality – don’t be afraid to change your lighting mid-scene to reflect this. The use of shadows and silhouettes can be particularly effective in dream sequences, suggesting the uncertain, half-formed nature of dream imagery. Ultimately, dream lighting should serve the emotional and psychological content of the sequence, creating a visual representation of the character’s subconscious mind.
Train Light Effects
Trains offer a wealth of dynamic lighting possibilities for the creative cinematographer. The rhythmic play of light and shadow as a train passes by can create a mesmerizing effect, while the confined space of a train car presents unique challenges and opportunities. When shooting exterior scenes of moving trains, consider the interplay of light sources – the warm glow from windows contrasting with cooler moonlight, or the harsh beam of the headlight cutting through darkness. For interior train scenes, the key is to create a sense of movement through lighting. This can be achieved with a “lighting gag” – a series of lights on dimmers that are switched on and off in sequence to simulate passing scenery or other trains. Don’t forget about practical sources within the train car itself – reading lights, overhead fixtures, or the warm glow of the dining car can all be used to create depth and interest in your compositions. Remember, train lighting should evoke a sense of journey and transition, reflecting the unique atmosphere of rail travel.
Interior of a Plane
Lighting the interior of an aircraft presents a unique set of challenges. The confined space and reflective surfaces require careful consideration to avoid unwanted reflections and to maintain a sense of depth. Start by considering the motivating light sources – typically, these would be the small reading lights above seats and the general overhead lighting. However, for dramatic effect, you might also consider the light coming through windows, which can create interesting patterns and shadows, especially during sunrise or sunset scenes. The key is to create a balance between realism and cinematic enhancement. Use soft sources to fill the space without creating harsh shadows, and consider using practicals (visible light sources within the frame) to add depth and interest to your compositions. Remember that different areas of the plane might require different lighting approaches – the dimly lit coziness of the passenger cabin contrasted with the brightly lit, clinical atmosphere of the cockpit, for instance. Lighting can also be used to enhance the psychological state of characters – harsh, unflattering light might emphasize discomfort or tension, while soft, warm light could suggest relaxation or luxury.
Steamship Interiors
The interior of a steamship offers a rich canvas for creative lighting. The combination of opulent public spaces and cramped private cabins provides opportunities for a wide range of lighting approaches. In grand ballrooms or dining rooms, consider the interplay of chandelier light with the warm glow of table lamps. Use this mix of high and low sources to create depth and dimensionality in your shots. For cabin scenes, the challenge often lies in suggesting a sense of space in very tight quarters. Use practical sources like bedside lamps or portholes to create pools of light that define different areas within the small space. Don’t forget about the unique quality of light coming through a porthole – this can be a strong motivating source, perhaps suggesting the movement of the ship through the play of light and shadow. For engine room scenes, consider using hard, contrasty light to emphasize the industrial nature of the space, with hot spots of intense light surrounded by deep shadow. Throughout the ship, remember that the constant motion of the vessel can be suggested through subtle changes in lighting, perhaps using slightly swaying shadows or shifting patterns of light.
Tents
Lighting a tent scene presents an interesting challenge: how to suggest the thin barrier between interior and exterior spaces. The key is to think about the quality of light that would penetrate the fabric of the tent. During daytime scenes, this would typically be a soft, diffused light that still maintains directionality. You can achieve this effect by using large, soft sources outside the tent, perhaps with patterns cut into them to suggest foliage or other obscuring elements. For nighttime scenes, consider the motivating light sources – perhaps a campfire outside the tent, or a lantern within. The warm glow of firelight can be particularly effective, creating interesting shadow play on the walls of the tent. Don’t forget about silhouettes – the shadows of people or objects on the walls of a lit tent can be a powerful storytelling tool. Remember also that tents come in different materials and colors, which will affect the quality of light within. A white canvas tent will create a bright, airy interior, while a dark nylon tent might require more creative solutions to illuminate effectively.
Gags and Tricks
In the world of cinematography, sometimes the most convincing effects are achieved through simple, practical solutions rather than complex technical setups. These “gags and tricks” are the secret weapons in a cinematographer’s arsenal. For example, to create the illusion of a moving vehicle without the expense and complexity of process shots, a well-placed oscillating fan blowing on an actor’s hair can suggest motion. Or consider the classic “blue hour” trick – shooting nighttime exterior scenes just after sunset, when there’s still enough ambient light for exposure but the sky appears dark on film. Another useful gag is the use of “invisible” wires to make objects appear to move on their own – the key here is careful lighting to ensure the wires remain undetectable. Sometimes, the simplest solutions are the most effective: a spritz of water on an actor’s face can instantly suggest perspiration, while a light haze in the air (easily achieved with a hazer) can add depth and atmosphere to any scene. The best cinematographers are often those who can problem-solve creatively, using these gags and tricks to achieve stunning visual effects efficiently and convincingly.
Transparency or Process Photography
Transparency or process photography, often referred to as “rear projection,” is a technique that allows filmmakers to combine live action with pre-filmed backgrounds. While largely supplanted by modern green screen techniques, understanding the principles of process photography can still be valuable for modern cinematographers. The key to effective process work lies in matching the lighting of the foreground elements (usually actors) with the lighting in the background plate. This requires careful analysis of the background footage to determine the direction, quality, and color of the light sources. The foreground lighting should then be set up to mimic these conditions as closely as possible. One common challenge is matching the contrast ratio of the foreground to the background – the projected image often has less contrast than real life, so foreground lighting may need to be softer than you might expect. Color temperature matching is also crucial – any mismatch between foreground and background color will immediately give away the effect. Remember also that the brightness of the projected image can affect your exposure calculations for the foreground elements. While modern digital techniques have largely replaced traditional process photography, the principles of seamlessly integrating foreground and background elements remain relevant in today’s visual effects-heavy productions.

Chapter 5: The Hollywood Close-up
Starlight
In Hollywood, starlight isn’t just about celestial bodies – it’s about creating that magical glow that transforms actors into icons. The art of lighting a star requires a deep understanding of facial structure, camera angles, and the subtle interplay of light and shadow. The goal is to enhance natural beauty while minimizing flaws, creating an almost ethereal quality that captivates the audience. This often involves a delicate balance of soft, flattering key light with carefully placed accent lights to sculpt the face. A subtle hair light can create a halo effect, separating the star from the background and adding a touch of glamour. Eye lights are crucial – a tiny sparkle in the eyes can bring a performance to life. Remember, starlight isn’t just about making someone look good – it’s about capturing their essence, their star quality. Each face is unique, and part of the art is finding the perfect lighting setup that not only flatters but also enhances the individual character of each star. In the hands of a skilled cinematographer, lighting becomes a form of visual alchemy, turning mere mortals into the gods and goddesses of the silver screen.
The Close-up Is Born
The birth of the close-up marked a revolutionary moment in cinema history, transforming the way stories are told on screen. In the early days of film, scenes were often shot from a distance, mimicking the perspective of a theater audience. The introduction of the close-up brought a new intimacy to cinema, allowing audiences to connect with characters on a deeply emotional level. From a lighting perspective, this shift presented both challenges and opportunities. Suddenly, every pore, every nuance of expression became visible, requiring a new level of precision in lighting technique. The key to a great close-up lies in understanding the architecture of the face – how light and shadow play across its contours to create mood and emphasize expression. A well-lit close-up doesn’t just show a face – it reveals character, conveys emotion, and drives the narrative forward. As cinematographers, we must approach each close-up as a miniature portrait, carefully crafting the light to support the performance and enhance the storytelling. The close-up is where the magic of cinema truly lives – it’s our job to make that magic shine.
Rules for Close-up Illumination
While there are no hard and fast rules in art, certain principles of close-up illumination have stood the test of time. First and foremost, understand the importance of the key light – its placement can make or break a close-up. Generally, a slightly elevated key light, around 30-45 degrees to the side of the camera, provides flattering modeling without creating unflattering shadows. The fill light should be subtle, providing just enough illumination to retain detail in the shadows without flattening the image. A backlight or hair light helps separate the subject from the background, adding depth to the shot. Pay close attention to the eyes – they should have a sparkle, a catch light that brings them to life. Be mindful of the nose shadow – it shouldn’t bisect the face or cover the lips. For more dramatic shots, consider using a stronger contrast ratio or more unusual lighting angles, but always in service of the story and character. Remember, these are guidelines, not rigid rules – don’t be afraid to experiment and find what works best for each unique face and situation. The goal is always to enhance the performance and support the narrative, not to show off lighting technique for its own sake.
The eight light system:
- Key Light – Typically placed on the side towards which the person to be photographed faces
- Fill Light – To prevent underexposure of any surface within the cameras field of view
- Filler Light – Placed beneath the key light to counter any harsh shadows on the face
- Clothelight – If the clothing detail is burnt out by the key light on the face, the clothes are either flagged or lit separately
- Backlight – Designed as a separation light from the background, and modeling of hair
- Kicker Light – Placed to the side of the face, helping round the face, and provides lighting when the actor turns their face in the direction of the kicker
- Eyelight – If the key light does not reflect in the eyes, this light can be added closer to the camera lens so the eyes shine, sparkle
- Background Light – Light hitting the background of the scene
Tools Used for Making Close-ups
The cinematographer’s toolkit for crafting the perfect close-up has evolved significantly over the years, but certain essential tools remain constant. Lenses are perhaps the most crucial – the choice between a 50mm, 85mm, or 100mm can dramatically affect the look of a close-up. Longer lenses tend to be more flattering, compressing facial features slightly, while wider lenses can add drama but risk distortion. Filters play a vital role – diffusion filters can soften skin texture and reduce the appearance of blemishes, while color filters can warm up skin tones or create specific mood effects. Flags, cutters, and gobos allow for precise control of light, essential for sculpting the face and creating depth. Eyelights – small, focused lights used to add a sparkle to the eyes – are a staple of classic Hollywood glamour lighting. Don’t underestimate the importance of makeup and hair styling in close-up work – they work hand in hand with lighting to create the final look. And of course, a good light meter is invaluable for achieving precise exposure. Remember, while these tools are important, they’re only as good as the artist wielding them. The most powerful tool in crafting a beautiful close-up is the cinematographer’s eye and understanding of light.
The Clock System of Placing Reflectors
The clock system is a simple yet effective method for communicating light placement on set. Imagine the set as the face of a clock, with the camera at 6 o’clock and the subject at the center. Using this system, we can quickly and accurately describe the position of lights. For example, a key light at 4 o’clock would be slightly to the right of the camera, while a backlight at 12 o’clock would be directly behind the subject. This system is particularly useful for close-ups, where precise light placement is crucial. A subtle shift from 3 o’clock to 2 o’clock can dramatically change the modeling on a face. The clock system also helps in planning more complex lighting setups. For instance, you might have your key at 4 o’clock, fill at 8 o’clock, and a kicker at 1 o’clock. This standardized language allows for clear communication between the cinematographer and the lighting team, ensuring that everyone is on the same page. Remember, the clock system is a tool for communication – the artistry lies in understanding how these light placements interact to create the desired effect.
Lighting Procedure
The process of lighting a close-up is as much an art as it is a science. Begin by studying the face you’re about to light – understand its unique features, its best angles, its challenges. Start with your key light, experimenting with its height and angle until you find the most flattering position. Next, add your fill light, carefully balancing it to retain shadow detail without losing the dimensionality created by the key. A backlight or hair light can help separate the subject from the background, adding depth to the image. Pay special attention to the eyes – a small eyelight can add life and sparkle. If needed, use flags or cutters to control spill and shape the light on the face. Don’t forget about the background – it should complement the subject without distracting from them. Always be prepared to adjust as you go – what looks good to the eye may not translate on camera, so work closely with your camera operator and monitor. Remember, lighting is not just about technical perfection – it’s about creating a mood, enhancing performance, and telling a story. The best close-up lighting supports and elevates the emotional content of the scene. Trust your eye, but also be open to happy accidents – sometimes the most beautiful shots come from unexpected places.


Chapter 6: Outdoor Photography
Films with Exteriors
Exterior shooting brings its own set of challenges and opportunities. Unlike controlled studio environments, outdoor locations are subject to the ever-changing whims of nature. However, this unpredictability can also lead to moments of unexpected beauty. When approaching a film with significant exterior work, it’s crucial to do thorough location scouting and planning. Understanding the path of the sun throughout the day can help you schedule shots to take advantage of the best natural light. Don’t underestimate the importance of weather forecasting – a sudden change in conditions can dramatically alter the look of your shots. While you can’t control the sun, you can shape and augment natural light using reflectors, diffusers, and artificial light sources. Remember that exterior shooting isn’t just about capturing pretty scenery – it’s about using the environment to enhance your storytelling. A well-chosen location can become a character in its own right, adding depth and context to your narrative. Be prepared for the technical challenges of outdoor work – protecting equipment from the elements, dealing with changing light conditions, and managing sound issues. With careful planning and a flexible approach, exterior shooting can add a level of authenticity and visual interest that’s hard to match on a soundstage.
Mood in Exteriors
Creating mood in exterior shots is all about understanding and manipulating the interplay of light, shadow, and environment. Natural light has its own inherent emotional qualities – the warm, golden light of late afternoon can evoke nostalgia or romance, while the harsh midday sun might suggest alienation or discomfort. The key is to recognize these qualities and use them to support your narrative. Cloud cover can be your friend, providing soft, diffused light that’s flattering for faces and easier to control. On bright, sunny days, look for ways to use shadow creatively – the dappled light under a tree canopy can create a sense of mystery or unease. Don’t be afraid of “bad” weather – rain, fog, or stormy skies can add dramatic atmosphere to your shots. Remember that mood isn’t just about lighting – the choice of location, the composition of your frame, and the movement of the camera all contribute to the overall feeling of a shot. In exterior work, the environment becomes an extension of your lighting toolkit. A distant mountain range can provide a natural backlight, while a reflective body of water can act as a giant bounce card. The goal is to work with the natural world, not against it, shaping and enhancing what’s already there to create the perfect mood for your scene.
Composition
Composition in outdoor cinematography is about finding harmony between the natural world and your subjects. The rule of thirds remains a useful guideline, but don’t be afraid to break it for dramatic effect. Use natural elements to frame your subjects – a gap in the trees, an archway, or the curve of a hillside can draw the viewer’s eye to the important parts of your image. Pay attention to the horizon line – generally, it shouldn’t bisect the frame unless you’re going for a specific effect. Instead, place it in the upper or lower third of the frame to emphasize either the sky or the ground. Leading lines are particularly effective in exterior shots – a winding road, a fence line, or a river can guide the viewer’s eye through the frame. Remember that composition isn’t static – consider how movement, both of the camera and within the frame, affects the balance of your shot. Depth is crucial in exterior work – use foreground elements to create a sense of scale and dimensionality. Don’t forget about negative space – sometimes what you leave out of the frame is as important as what you include. Above all, composition should serve your story – every element in the frame should contribute to the narrative or emotional impact of the shot.
Painting with Sun Reflectors
Sun reflectors are the outdoor cinematographer’s best friend, allowing for precise control and shaping of natural light. These simple tools can transform harsh, unflattering sunlight into soft, beautiful illumination. The key is understanding the different types of reflectors and how to use them effectively. Silver reflectors provide a strong, neutral bounce that’s great for filling in shadows or creating a kicker light. Gold reflectors add warmth to the light, which can be particularly flattering for skin tones, especially in the cooler light of early morning or late afternoon. White reflectors offer a softer, more diffused reflection that’s useful for general fill light. When using reflectors, pay attention to the angle – even a slight adjustment can dramatically change the quality of the reflected light. For close-ups, a handheld reflector allows for precise control, following the actor’s movements. On a larger scale, big frames with reflective fabric can illuminate entire areas. Remember that reflected sunlight can be incredibly powerful – always be mindful of your actors’ comfort and safety. With practice, you’ll learn to “paint” with reflected light, using it to sculpt faces, separate subjects from the background, and add depth to your images. In the hands of a skilled cinematographer, sun reflectors can turn ordinary sunlight into extraordinary imagery.
The eight light system on exteriors
- FILL LIGHT – Nature took care of this. As a matter of fact sometimes there is too much of it, so that we must stop down in order not to over- expose our picture.
- KEYLIGHT – This can be sunlight, either direct or dif- fused by use of butterflies or other trans- lucent materials. As there is only one sun, if it is used as backlight we must find another light source for the key. In such a case the gold sun reflector is used. This can be used diffused with a net over it to soften the light. Artificial light too can be used for keylight.
- FILLER LIGHT – There is usually enough fill light to serve as filler also. However, if the keylight is too strong and there is no other means of balanc- ing the light, additional filler is used. For this we can use sun reflectors. For faces the gold side should be used.
- CLOTHESLIGHT – As this has to be more pronounced than the key or filler, the silver side of the sun reflector is recommended.
- BACKLIGHT – Because sun reflectors cannot be suspended in open spaces, they can be used as backlight only where they can be hidden behind the people photographed, as on roof tops, trees, etc. The direct sun makes the best backlight. If too strong it can be softened with the aid of the long-necked butterfly.
- KICKER LIGHT – The best kicker light is the sunlight itself, but if its use is not feasible, sun reflectors will serve. As the reflector must be placed some distance away from the people, the silver side is used because it carries further.
- EYELIGHT – For eyelight the gold side of the sun re- flector can be used, if possible with a net over it. The best is the small gold one made up especially for this purpose. It is small, easy to carry or hold in the hand, and not too dif- ficult to look into directly. This reflects sun- light into the eyes, giving them that neces- sary sparkle.
- BACKGROUND LIGHT – Backgrounds are usually lit by nature her- self, but if not we “pump” light into them. Glass mirrors are used as reflectors if the background is green, tin if it is dark walls or other dark objects, and gold reflectors if it is white walls, etc. Even if we don’t use boosters, the back- ground can be broken by use of an arc, and shadows can be projected on a monotone wall. Do not try to illuminate large surfaces with sun reflectors; they never look natural.
Booster Lights
While natural light is often the star of exterior cinematography, there are times when it needs a little help. This is where booster lights come in – artificial light sources used to augment or shape natural light in outdoor settings. The key to effective use of booster lights is subtlety – they should enhance the natural light, not overpower it. HMI lights are particularly useful for this, as their color temperature closely matches daylight. Use boosters to fill in harsh shadows on faces, to add a kick of light to separate subjects from the background, or to maintain consistent illumination when clouds pass over the sun. When shooting “day for night,” boosters can help maintain the illusion of moonlight. Remember that mixing artificial and natural light requires careful color balancing – use gels to match your booster lights to the prevailing natural light. Power can be a challenge on location, so be prepared with generators or battery-powered LED units. The placement of booster lights is crucial – they should feel motivated by the natural light in the scene. Used skillfully, booster lights can give you the best of both worlds – the beauty of natural light with the control of studio lighting.
Painting with Filters
Filters are the cinematographer’s palette, allowing for subtle or dramatic alterations of the image directly in camera. In outdoor work, filters can help overcome the limitations of natural light or enhance its qualities. Neutral density filters are essential for controlling exposure, allowing you to maintain your desired aperture even in bright sunlight. Polarizing filters can deepen skies, reduce reflections, and increase color saturation. Color correction filters can warm up or cool down the light, matching it to your creative vision or helping to sell the illusion of a different time of day. Diffusion filters soften the image, reducing the harshness of midday sun on faces. Graduated filters are particularly useful in landscape shots, balancing bright skies with darker foregrounds. For more dramatic effects, color grad filters can add sunset warmth to the sky or deepen the blue of the ocean. Remember that filters affect your exposure – always meter through the filter or compensate accordingly. The art of using filters is knowing when to use them and when to let nature speak for itself. Like any tool, they should serve the story and enhance the emotional impact of your images. With careful application, filters can transform ordinary light into extraordinary visuals, painting your cinematic canvas with subtle strokes or bold splashes of color.
Light Problems
Exterior cinematography often means grappling with light problems that are beyond your control. Harsh midday sun can create unflattering shadows and excessive contrast. Rapidly changing cloud cover can wreak havoc on continuity. Low winter sun might give you beautiful light, but for a very limited time each day. The key to overcoming these challenges is preparation and flexibility. Always have a plan B (and C and D) for when the weather doesn’t cooperate. Diffusion frames can soften harsh sunlight, while negative fill can add contrast on overcast days. For scenes that need to match across multiple shots, consider shooting everything in the same direction relative to the sun, even if it means cheating the geography of your location. Time of day is crucial – the golden hours around sunrise and sunset offer beautiful light but require efficient work. Don’t underestimate the importance of scouting – understanding how light moves across your location throughout the day can help you plan your shoot more effectively. Remember that what looks like a problem can often be turned into an opportunity – unexpected weather conditions might give you a chance to add visual interest or emotional resonance to your scene. The best cinematographers are problem solvers, able to adapt to changing conditions while maintaining their artistic vision.
Westerns
The Western genre presents unique challenges and opportunities for the cinematographer. These films often rely heavily on exterior shots, showcasing the rugged beauty of the landscape. The key is to capture the epic scope of the environment while maintaining intimate character moments. Wide angle lenses can emphasize the vastness of the terrain, while longer lenses compress space, bringing distant mountains into closer relationship with your subjects. Pay attention to the quality of light throughout the day – the harsh midday sun of the desert can create a sense of unforgiving brutality, while the golden hour can lend a nostalgic, almost mythic quality to your images. Don’t be afraid of silhouettes – a lone rider on a ridge against the setting sun is an iconic Western image for good reason. When it comes to interiors, embrace shadow and contrast. Many Western locations have limited interior light sources, so work with what’s available – a shaft of sunlight through a window or the warm glow of lantern light can create powerful, moody images. Remember that Westerns often deal with themes of man versus nature, so use your cinematography to emphasize this relationship. Whether you’re shooting vast landscapes or tight close-ups, let the unique visual language of the Western genre inform your choices.
The New School of Exterior Photography
The landscape of exterior cinematography is constantly evolving, driven by advances in technology and changing aesthetic sensibilities. Today’s “new school” approach often embraces a more naturalistic style, moving away from the heavily controlled look of classic Hollywood. This might mean working with available light as much as possible, using faster lenses and more sensitive cameras to capture low-light situations that would have been impossible in the past. There’s a growing appreciation for the imperfections and unpredictability of natural light – lens flares, for instance, are often intentionally included rather than avoided. Handheld camera work and long takes are more common, aiming for a sense of immediacy and realism. However, this doesn’t mean a lack of control – it’s about understanding natural light so well that you can work with it seamlessly.
Chapter 7: Symphony in Snow
On Vacation
Capturing the essence of a winter vacation through the lens requires a keen eye for the unique qualities of snow-covered landscapes. The pristine white expanses offer a blank canvas for creative composition, but they also present technical challenges. The key to successful snow photography lies in understanding how to balance exposure in high-contrast situations. Snow reflects an enormous amount of light, which can fool your camera’s meter into underexposing the scene. To combat this, consider overexposing by 1-2 stops from what your meter suggests. This will maintain detail in the snow while preventing your subjects from becoming dark silhouettes. Early morning and late afternoon light can create stunning effects on snow, casting long shadows and bathing the landscape in warm hues that contrast beautifully with the cool tones of the snow. Don’t shy away from overcast days – the soft, diffused light can be perfect for capturing the subtle textures and tones of snow. Remember that color becomes more important than ever in winter scenes – look for pops of color (a red jacket, blue sky, or evergreen trees) to add visual interest to your compositions. And always be prepared for rapidly changing weather conditions – a sunny day can quickly turn into a dramatic snowstorm, offering entirely new photographic opportunities.
On Location
When shooting on location in snowy conditions, preparation is key. The cold can be brutal on both equipment and crew, so proper planning is essential. Batteries drain faster in cold temperatures, so always carry spares and keep them close to your body to maintain their charge. Rapid temperature changes can cause condensation on your lenses, so allow time for your equipment to acclimate when moving between warm interiors and the cold outdoors. Snow can be highly reflective, so neutral density filters are crucial for maintaining control over your exposure and depth of field. When composing your shots, look for ways to add depth to the scene – use foreground elements like snow-laden branches to frame your subject, or capture falling snow to create a sense of atmosphere. Light in snow conditions can be tricky – the intense reflectivity can create harsh shadows and blown-out highlights. Use reflectors or fill flash to soften shadows on faces, and consider using a polarizing filter to control glare and enhance the blue of the sky. Don’t forget about the unique sounds of a snowy environment – the crunch of footsteps, the muffled quiet after a fresh snowfall – these can add an extra dimension to your winter scenes. Finally, always prioritize safety – snow and ice can create hazardous conditions, so be aware of your surroundings and never compromise safety for a shot.


Chapter 8: Ocean Voyage
Love, Live, Laugh, and Loaf
Capturing the spirit of an ocean voyage requires more than just pointing your camera at the sea. It’s about conveying the sense of adventure, relaxation, and discovery that comes with life on the water. Start by documenting the embarkation – the excitement and anticipation as passengers board the ship. As you sail away from port, look for compositions that show the transition from land to sea. Once at sea, focus on the rhythms of shipboard life – the leisurely pace of deck activities, the social interactions in common areas, the quiet moments of contemplation as passengers gaze out at the endless horizon. Light on the open ocean can be breathtaking but challenging – the harsh midday sun can create extreme contrast, while the golden hours of sunrise and sunset offer spectacular photo opportunities. Don’t forget to capture the small details that make ocean travel unique – the wake of the ship, the salt spray on the decks, the intricate workings of the ship itself. And remember, a voyage is as much about the people as it is about the place – look for candid moments that tell the human story of life at sea. Whether it’s a luxury cruise or a rugged expedition, your goal is to transport the viewer onto the ship and into the journey.
Preparation
Proper preparation is crucial for successful ocean voyage photography. First, consider your equipment – a versatile zoom lens can be invaluable for capturing both wide seascapes and details on the ship. A sturdy tripod is essential for low-light situations and long exposures, but make sure it’s heavy enough to remain stable on a moving deck. Pack plenty of lens cleaning supplies – salt spray can quickly accumulate on your gear. Weather-sealed equipment is ideal, but if that’s not available, bring rain covers for your camera and lenses. Research your itinerary in advance – knowing what to expect at each port of call can help you plan your shots. If you’re hoping to capture wildlife, bring a longer telephoto lens. For interior shots on the ship, a fast wide-angle lens can be useful in tight, dimly lit spaces. Don’t forget about storage – bring more memory cards than you think you’ll need, and consider a portable hard drive for backing up your images. Finally, familiarize yourself with the ship’s rules regarding photography – some areas may be off-limits, and there may be restrictions on the use of drones or other equipment. With thorough preparation, you’ll be ready to capture every aspect of your ocean voyage.
At Sea
Photography at sea presents unique challenges and opportunities. The constant motion of the ship requires a keen sense of timing and a steady hand. Increase your shutter speed to combat camera shake, especially in rougher seas. The open ocean offers endless possibilities for minimalist compositions – look for the interplay of sea and sky, broken only by the occasional passing ship or leaping dolphin. Sunrises and sunsets at sea can be spectacular – be ready to capture the sun as it appears to rise from or sink into the ocean. Night photography on a ship can yield stunning results – try long exposures to capture star trails or the moonlit surface of the water. Don’t neglect the human element – document life onboard, from the crew at work to passengers enjoying the voyage. Weather can change rapidly at sea, so be prepared to capture everything from calm, glassy waters to dramatic storms. Remember that the ship itself can be a subject – look for interesting angles and details that convey the scale and engineering of the vessel. And always be aware of safety – secure your equipment in rough weather and never put yourself at risk for a shot. The key to great ocean photography is patience and observation – the sea is ever-changing, and amazing photo opportunities can appear in an instant.
Taking Pictures
When taking pictures on an ocean voyage, variety is key. Start with establishing shots that give a sense of place – wide views of the ship at sea, panoramas of the coastline as you depart or approach port. Then move in closer, capturing the details that bring the voyage to life. Look for interesting textures – the weathered wood of the deck, the smooth curves of the ship’s railings, the ripples on the water’s surface. People are an essential part of the story – capture candid moments of passengers enjoying the journey, as well as portraits that show the character of your fellow travelers and the ship’s crew. Don’t forget about action shots – whether it’s the splash of waves against the bow or activities on deck, movement can add energy to your images. Be mindful of the changing light throughout the day – early morning and late afternoon offer warm, directional light that can be particularly flattering. Experiment with different perspectives – shoot from high vantage points for an overview of the deck, or get low to emphasize the vastness of the sea. And always be ready for the unexpected – wildlife sightings, sudden weather changes, or beautiful cloud formations can provide unique photo opportunities. Remember, the goal is not just to document your trip, but to capture the essence of the ocean voyage experience.
Arrival at a Foreign Port
The arrival at a foreign port is a moment filled with excitement and photographic potential. As the ship approaches land, look for shots that show the transition from sea to shore – the coastline emerging from the mist, the gradual appearance of buildings and landmarks. Capture the bustle of activity as the ship docks – tugs guiding the vessel in, dock workers preparing to receive the ship, passengers lining the rails for their first glimpse of a new destination. The quality of light can be particularly beautiful during arrival, especially if you’re coming into port at sunrise or sunset. Look for compositions that juxtapose the ship with the new environment – the contrast of the familiar vessel against an exotic backdrop can make for compelling images. As you disembark, capture the sense of discovery – wide-eyed passengers taking in their new surroundings, the colorful chaos of a foreign harbor. Don’t forget to document the small details that give a sense of place – local signage, distinctive architecture, traditional dress. And always be respectful of local customs and regulations regarding photography. The arrival at a foreign port is not just a transition in your journey, but a rich photographic opportunity to capture the essence of travel and cultural exchange.
In Port
Once in port, the photographic possibilities expand dramatically. Start by capturing the local flavor – bustling markets, historic landmarks, unique architecture. Street photography can be particularly rewarding in a foreign port, offering glimpses into daily life and local culture. Look for interesting characters, vibrant colors, and telling details that speak to the essence of the place. Don’t neglect the maritime aspects of the port – fishing boats, cargo operations, and naval vessels can all make for interesting subjects. The interplay between the visiting cruise ship and the local environment can create intriguing contrasts – look for shots that show the scale of the ship against the local skyline. As the day progresses, be aware of changing light conditions – harsh midday sun can be challenging, but can also create interesting shadow patterns in narrow streets or courtyards. If time allows, consider venturing beyond the immediate port area to capture a broader sense of the region. And always be mindful of your surroundings – keep your equipment secure and be aware of areas where photography might not be welcome. Remember, your goal is not just to document the sights, but to capture the unique atmosphere and character of each port you visit.
Homeward Bound
As your voyage comes to an end, there are still plenty of photographic opportunities to explore. Capture the mood of passengers as they prepare to return home – a mixture of relaxation from the journey and perhaps a touch of melancholy as the adventure concludes. Look for shots that summarize the experience – passengers exchanging contact information, souvenirs from various ports displayed in cabins, or luggage being prepared for disembarkation. The journey back to your home port can offer a chance for reflection – both for your subjects and in your photography. Consider creating a visual narrative of the return journey, from the last sunset at sea to the approach of familiar shores. Don’t forget to document the final onboard activities and farewell events. As you near your destination, look for compositions that bring your photographic story full circle – perhaps echoing shots you took at the beginning of the voyage, but now infused with the experience of the journey. And as you disembark, capture the reactions of passengers as they step back onto home soil, marking the end of one adventure and perhaps the beginning of planning for the next. The homeward bound portion of your trip is not just an ending, but an opportunity to create a satisfying conclusion to your visual narrative of the ocean voyage.
Chapter 9: Visual Music
Visual Symphony
The concept of visual music in cinematography is about creating a harmonious flow of images that evokes emotional responses similar to those produced by music. Just as a musical composition has rhythm, melody, and harmony, a well-crafted sequence of shots can create a visual symphony. Start by considering the rhythm of your editing – the pacing of cuts can create tension or relaxation, much like the tempo of a musical piece. The “melody” might be carried by your main subject, while supporting elements provide the harmony. Color plays a crucial role in this visual music – think of how different color palettes can evoke different moods, much like major and minor keys in music. Movement within the frame and camera movement can add dynamics to your visual composition, like crescendos and diminuendos in music. Light and shadow become your instruments, their interplay creating visual notes that resonate with the viewer. Consider how different shots relate to each other – a wide establishing shot followed by a series of details can be like a musical theme and variations. The key is to think beyond individual shots to the overall flow and emotional impact of the sequence. Just as a great piece of music can transport the listener, a well-composed visual symphony can immerse the viewer in the world of your film, creating a powerful emotional experience.


Chapter 10: The Portrait Studio
Improvements
The modern portrait studio is evolving beyond the traditional backdrop and three-point lighting setup. Today’s improvements focus on creating a more dynamic and personalized experience for subjects. Consider incorporating multiple shooting areas within your studio, each with its own lighting setup and mood. This allows for greater variety in a single session and can help subjects feel more relaxed as they move through different environments. Invest in high-quality continuous lighting – it allows subjects to see exactly how they’ll be lit and can be less intimidating than traditional strobes. Tethered shooting with a large display lets clients see images immediately, increasing their engagement and confidence. Don’t neglect the waiting area – a well-designed, comfortable space can help put clients at ease before their session. Consider adding a makeup and styling area, either as a service you offer or a space for clients to make final adjustments. In terms of backdrops, move beyond plain paper – textured walls, large prints of locations, or even projected backgrounds can add interest and depth to your portraits. Remember, the goal is to create an environment where subjects feel comfortable and creative expression can flourish. By continually improving your studio space and workflow, you can elevate the quality of your portraits and the experience you offer your clients.
Make-up and Portrait
The relationship between make-up and portrait photography is a delicate dance of enhancement and authenticity. The goal is to make the subject look their best while still maintaining their natural essence. Start by ensuring your make-up area is well-lit with daylight-balanced bulbs to ensure accurate color application. Consider offering professional make-up services, or at least have a selection of touch-up products on hand. When applying make-up for portraits, the key is subtlety – it should enhance features without being noticeable in the final image. Pay particular attention to skin preparation – a well-moisturized face will photograph better than one with dry or flaky skin. For the eyes, focus on definition rather than heavy color – well-defined brows and lashes can make a significant difference in a portrait. Be mindful of how different make-up looks translate on camera – what looks natural in person may need to be intensified for the camera, or vice versa. Always do a test shot to check how the make-up is photographing before proceeding with the full session. Remember that make-up isn’t just for women – subtle grooming for men can greatly enhance a portrait. Ultimately, the make-up should work in harmony with your lighting and posing to create a flattering, authentic representation of your subject.


Chapter 11: The Laboratory
Screen Tests
Screen tests are a crucial yet often overlooked aspect of cinematography. They provide an opportunity to experiment and refine your approach before the pressure of actual production begins. When conducting screen tests, it’s important to replicate the conditions of the actual shoot as closely as possible. This includes using the same camera, lenses, and lighting setups you plan to use during production. Start by testing different film stocks or digital camera settings to determine which best captures the look you’re after. Pay close attention to how different lighting setups affect skin tones and costume textures. This is also the time to experiment with filters, diffusion, and other in-camera effects. For actors, screen tests are not just about appearance, but also about movement and presence on camera. Test how they look in different types of shots – close-ups, medium shots, and wide shots. If possible, run through some actual scenes from the script to see how the actors inhabit their characters visually. Don’t forget to test hair, makeup, and costumes under your planned lighting conditions – what looks good in the makeup chair may not translate on camera. Finally, always review your screen tests on a large screen in a properly calibrated viewing environment. This will give you the most accurate representation of how your choices will play out in the final product. Remember, the time spent on thorough screen tests can save countless hours and potential issues during actual production.
The Contact Man
The role of the contact man in the laboratory process is often underappreciated, yet it’s crucial for maintaining the cinematographer’s vision throughout post-production. This individual serves as the bridge between the set and the lab, ensuring that the nuances of lighting and exposure captured during filming are faithfully reproduced in the final print. A good contact man should have a deep understanding of both the technical aspects of film processing and the artistic intentions of the cinematographer. They need to be able to communicate effectively with both the camera crew and the lab technicians, translating creative vision into technical specifications. The contact man’s responsibilities include overseeing dailies, ensuring that the development process is tailored to the specific needs of each shot, and troubleshooting any issues that arise during processing. They should be well-versed in color timing and able to guide the lab in achieving the desired look for each scene. In the digital age, the role has evolved to include overseeing the creation of digital dailies and managing color pipelines. A skilled contact man can be the difference between a good-looking film and a great-looking one, preserving the cinematographer’s carefully crafted images through to the final product.
Negative Developing
The process of negative developing is where the latent image captured on set is transformed into a visible image. While much of modern cinematography has moved to digital, understanding the principles of negative developing remains crucial, especially for those working with film or aiming to replicate film looks digitally. The key to successful negative developing lies in precision and consistency. Temperature control is critical – even small variations can significantly affect the contrast and density of the image. The choice of developer and development time can dramatically alter the characteristics of the image, influencing factors like grain, contrast, and shadow detail. Push or pull processing – where the film is over or under-developed to compensate for exposure issues – can be a powerful tool in the cinematographer’s arsenal, but requires careful coordination between the set and the lab. In color negative developing, maintaining precise chemical balances is essential to avoid color shifts. The skill of the technician in interpreting the cinematographer’s intentions and adjusting the process accordingly cannot be overstated. Even in the digital age, many of these principles apply to RAW processing. Understanding the relationship between exposure on set and development in post can give cinematographers greater control over their final image. Remember, the negative (or RAW file) is your digital original – treat it with care and respect, as it contains all the information needed to realize your visual vision.
Chapter 12: Day and Night, Ladies, Watch Your Light
Faces
The human face is perhaps the most challenging and rewarding subject for a cinematographer. Lighting faces requires a delicate balance of technical skill and artistic sensitivity. The goal is not just to illuminate, but to reveal character, enhance emotion, and support the narrative. Start by understanding the architecture of the face you’re lighting – every face is unique, with its own contours, angles, and features. The placement of your key light is crucial – even a slight adjustment can dramatically change the mood and character of the face. Generally, a slightly elevated key (about 30 degrees above eye level) is flattering for most faces, but don’t be afraid to experiment. Pay attention to the eyes – they should have a sparkle, a catch light that brings life to the face. The fill light is equally important, softening shadows and revealing detail. The ratio between key and fill will determine the overall contrast and mood of your shot. For more dramatic looks, consider using side lighting or even underlighting, but always in service of the story. Remember that faces change with movement and expression – what looks good in a still frame may not work for a dynamic performance. Always be prepared to adjust your lighting as the scene unfolds. Ultimately, the goal is to create lighting that enhances the performance and supports the emotional tone of the scene, allowing the audience to connect with the characters on screen.
Interior Illumination of the Home
Lighting interiors for a home setting requires a different approach than studio lighting. The goal is to create a natural, lived-in feel while still maintaining the control needed for cinematography. Start by considering the practical sources within the space – table lamps, ceiling fixtures, windows. These should form the basis of your lighting plan. Use soft boxes or Chinese lanterns to mimic the diffused light from ceiling fixtures, and smaller units like Dedolights to replicate the focused beams of table lamps. Windows are a key factor in daytime interior scenes – use large HMI units outside to create the illusion of sunlight streaming in, and be mindful of how this light changes throughout the day. For night scenes, practical sources become even more important. Consider the color temperature of different light sources – mixing warm and cool tones can create depth and interest in your frame. Don’t be afraid of shadows – in a real home, not every corner is perfectly lit. Use flags and cutters to shape your light and create areas of shadow that add depth to your composition. Remember that different rooms have different moods – the warm, intimate lighting of a bedroom will be very different from the bright, functional light of a kitchen. Always consider the time of day and the emotional tone of the scene when planning your lighting. The key is to create a lighting scheme that feels natural and motivated, while still giving you the control you need to capture beautiful images.
Outdoor Lighting
Outdoor lighting presents both challenges and opportunities for the cinematographer. Natural light is constantly changing, requiring quick thinking and adaptability. The key is to work with the available light rather than fighting against it. Start by understanding the quality of light at different times of day – the warm, directional light of golden hour is very different from the harsh overhead sun of midday. Plan your shooting schedule to take advantage of the best natural light when possible. When you can’t control the sun, use tools to shape and modify the light. Reflectors can bounce light into shadow areas, while diffusion frames can soften harsh sunlight. For scenes that require more control, consider using large HMI units to augment or even replace natural light. This can be particularly useful for maintaining continuity in scenes that are shot over several hours or days. Don’t neglect the background – use backlighting to separate subjects from their surroundings, and consider how the light interacts with elements like trees or buildings to create depth in your frame. In urban settings, be aware of how artificial light sources like streetlamps or neon signs can affect your image, especially as day turns to night. Remember that weather conditions can dramatically change the quality of light – clouds can provide beautiful, soft diffusion, while rain can create reflective surfaces that add interest to your frame. The key to successful outdoor lighting is flexibility and a deep understanding of how light behaves in different conditions.
Lighting in Clubs, Bars, and Restaurants
Lighting for clubs, bars, and restaurants requires a careful balance between creating atmosphere and maintaining enough illumination for your camera. These environments are often characterized by low light levels and high contrast, which can be challenging to capture effectively. Start by embracing the practical light sources within the space – neon signs, bar lights, candles on tables. These can provide motivation for your lighting scheme and add authenticity to the scene. Use small, easily hidden units like LED panels or Dedolights to augment these practicals without revealing your light sources. Color plays a crucial role in these environments – consider using gels to create the saturated, moody tones often found in clubs and bars. For restaurant scenes, warm tones can create an inviting atmosphere, while cooler tones might suggest a more upscale establishment. Don’t be afraid of contrast – pools of light surrounded by deep shadow can create a sense of intimacy and drama. However, be mindful of exposure – you may need to use faster lenses or higher ISO settings to capture these low-light environments effectively. For dance floor scenes, consider using moving lights or strobes to create energy and movement in your frame. Remember that these environments often have reflective surfaces like mirrors or glossy bar tops – be aware of unwanted reflections of your equipment or crew. The goal is to create lighting that feels authentic to the space while still allowing you to capture the performances and action effectively.
Architectural Lighting
Lighting architecture for film requires a deep appreciation for form, texture, and scale. The goal is not just to illuminate a structure, but to reveal its character and create mood. Start by studying the building’s design – its lines, materials, and unique features. Use light to accentuate these elements, creating depth and dimension. Grazing light along a textured surface can bring out detail, while uplighting can create a sense of grandeur. Consider the time of day and the mood you want to convey – harsh daylight might emphasize a building’s imposing nature, while soft twilight could reveal its more romantic aspects. For night exteriors, think about how the building’s internal lighting interacts with your exterior sources. Windows become light sources of their own, adding depth and life to the structure. Don’t be afraid of shadows – they can add drama and mystery to your composition. For interiors, pay attention to how light enters the space naturally and use this as motivation for your lighting scheme. Large, soft sources can mimic window light, while hard sources can create dramatic patterns that emphasize architectural features. Remember that different materials interact with light in different ways – glass, metal, stone, and wood all have unique properties that can be highlighted or subdued with careful lighting. The scale of architectural lighting often requires powerful units like 18K HMIs, but the principles of shaping and controlling light remain the same as in smaller setups. The key is to use light to tell the story of the building, revealing its character and place within the larger narrative of your film.


Chapter 13: Motion Picture Theatres
The Headache
The problem of viewer discomfort in motion picture theatres, often manifesting as headaches, is a complex issue that involves more than just the quality of the projection. As cinematographers, we must be aware of how our choices on set can contribute to or alleviate this problem. High contrast ratios, while dramatic, can cause eye strain when viewed for extended periods. Consider using techniques like soft contrast, where shadows retain detail, to create a more comfortable viewing experience. Rapid cutting and excessive camera movement can also contribute to viewer discomfort. While these techniques can be effective when used judiciously, overuse can lead to a sense of visual fatigue. Pay attention to the overall brightness of your images – consistently dark scenes may cause viewers to strain their eyes, while overly bright scenes can be jarring in a dark theatre. Color is another factor to consider – highly saturated or clashing colors can be fatiguing to watch over time. Strive for a balanced color palette that supports your story without overwhelming the viewer. Remember that what looks good on a small monitor may have a different impact when projected on a large screen. Whenever possible, view your work in a theatrical setting during post-production to ensure it translates well to the big screen. By being mindful of these factors, we can create visually striking films that are also comfortable for audiences to watch.
The Modern Theatre
The evolution of the modern motion picture theatre presents both challenges and opportunities for cinematographers. With the advent of digital projection, we have unprecedented control over the final image quality, but this also means we need to be more aware of how our work will be displayed. High Dynamic Range (HDR) and wide color gamut technologies allow us to capture and display a broader range of tones and colors than ever before. However, this requires careful consideration during production and post-production to ensure we’re taking full advantage of these capabilities without creating images that are difficult to watch. The trend towards larger screens and immersive formats like IMAX demands a different approach to composition and movement – what works on a standard screen may feel overwhelming on a massive one. Audio has also advanced significantly, with surround sound systems becoming increasingly sophisticated. As cinematographers, we should be aware of how our visual choices interact with and support the audio experience. Modern theatres are also experimenting with variable seating arrangements and even interactive elements. This may influence how we frame shots and plan camera movements, knowing that viewers may be experiencing our work from different angles or in a more participatory way. Despite these technological advancements, the fundamental goal remains the same – to create a captivating visual experience that draws the audience into the story. By understanding the capabilities and limitations of modern theatres, we can create images that truly shine on the big screen, providing audiences with an unforgettable cinematic experience.
Chapter 14: The World is a Huge Television Studio and We Are All Photographers
The Human Camera
The concept of the human eye as a camera is more than just a metaphor – it’s a profound insight into how we perceive and interpret the world around us. Like a camera, our eyes have lenses that focus light onto a light-sensitive surface (the retina, in our case). Our pupils act like apertures, adjusting to control the amount of light entering the eye. Even the way we process visual information is similar to how a camera captures an image – our brains interpret the signals from our eyes to create a mental picture of our surroundings. However, the human camera is far more sophisticated than any mechanical device. Our eyes can adapt to an incredibly wide range of lighting conditions, from bright sunlight to near darkness. We can selectively focus on different parts of our visual field almost instantly, and our peripheral vision gives us a much wider field of view than most cameras. Moreover, our visual perception is heavily influenced by our past experiences, expectations, and emotions – we don’t just see, we interpret. As cinematographers, understanding how the human camera works can greatly inform our approach to visual storytelling. We can use techniques like selective focus, contrast, and framing to guide the viewer’s attention in ways that feel natural and intuitive. By studying how our own visual system works, we can create images that resonate more deeply with our audience’s innate way of seeing the world.
The Laboratory
The concept of the human brain as a film laboratory is a powerful analogy for understanding how we process and store visual information. Just as a film lab develops negatives and creates prints, our brains take the raw visual data from our eyes and transform it into the rich, meaningful images we experience. The ‘development process’ in our brains involves complex neural pathways that enhance contrast, detect edges, and recognize patterns. Our ‘mental darkroom’ is incredibly sophisticated, capable of adjusting for different lighting conditions, filling in missing information, and even correcting for optical illusions. The way we ‘store’ these images is akin to filing negatives – our memories are not perfect recordings, but rather reconstructions that can be influenced by context and emotion. As filmmakers, understanding this mental processing can inform how we construct our images. We can use visual cues that tap into the brain’s natural tendencies, creating shots that are not just visually pleasing, but also easier for the viewer to process and remember. For example, using strong leading lines or contrasting elements can help guide the viewer’s attention in a way that feels natural and effortless. By aligning our cinematography with the way the human ‘laboratory’ works, we can create more effective and impactful visual stories.
What Is Thinking?
The process of thinking, when viewed through the lens of visual imagery, reveals fascinating parallels to cinematography. When we think, we often create mental images, much like a cinematographer composing shots. These mental images can be static, like photographs, or dynamic, like movie scenes. Our thoughts can zoom in on details or pan out for a broader perspective. We can ‘cut’ from one mental image to another, creating associations and narratives. This visual aspect of thinking is particularly relevant to cinematographers. When we conceptualize a shot or a sequence, we’re essentially creating a mental storyboard. Our ability to visualize scenes before we shoot them is a crucial skill, allowing us to pre-visualize lighting setups, camera movements, and compositions. Moreover, understanding how people think visually can inform how we construct our shots to convey ideas and emotions effectively. For instance, the way we naturally associate certain visual elements with specific emotions or concepts can be leveraged in our cinematography to create more resonant images. The process of creative thinking in cinematography often involves combining and recombining visual elements in new ways, much like how our minds create new ideas by connecting existing concepts. By recognizing the visual nature of thought, we can tap into a deeper well of creativity and create images that not only look beautiful but also resonate with the way our audience thinks and perceives the world.
Television
The analogy of the world as a huge television studio and all of us as photographers speaks to the ubiquity of visual media in our modern world. With the proliferation of smartphones and social media platforms, everyone has become a potential creator and broadcaster of visual content. This democratization of image-making has profound implications for professional cinematographers. On one hand, it means that audiences are more visually literate than ever before, able to appreciate sophisticated visual storytelling. On the other hand, it raises the bar for what constitutes truly exceptional cinematography. As professionals, we must push ourselves to create images that go beyond what can be achieved with a smartphone camera. This might mean embracing more complex lighting setups, experimenting with unusual lenses or camera movements, or finding new ways to manipulate color and contrast. At the same time, we can learn from the spontaneity and immediacy of amateur photography. The raw, unfiltered quality of user-generated content has its own aesthetic appeal, which can be incorporated into more polished professional work for added authenticity. The idea that we are all constantly both capturing and broadcasting images also speaks to the power of visual storytelling in our culture. As cinematographers, we have the responsibility and the privilege of shaping how people see the world. By honing our craft and pushing the boundaries of what’s possible with the camera, we can continue to create images that captivate, inspire, and illuminate, even in a world where everyone is a photographer.
Conclusion
From the intricate dance of light and shadow on a Hollywood sound stage to the raw beauty of natural light in exterior shots, we’ve explored the myriad ways in which cinematographers shape the visual narrative. We’ve delved into the nuanced art of close-up photography, the challenges of special illumination, and the poetry of visual music. We’ve voyaged across oceans, traversed snowy landscapes, and peered into the intimate spaces of portrait studios.
This book serves not just as a guide to technique, but as an invitation to see the world through a cinematographer’s eyes—to recognize the play of light and shadow in everyday life, to appreciate the subtle ways in which visual elements can convey emotion and meaning, and to understand the power of the image to transcend language and culture.
In the end, “Painting with Light” is a celebration of cinema itself—of its ability to captivate, to illuminate, and to transform how we see the world. It is a reminder that with every frame, we have the opportunity to create something truly magical: a moment of visual poetry that can touch hearts and minds across time and space. As we close this chapter, let it be an inspiration to continue exploring, experimenting, and pushing the boundaries of what’s possible when we paint with light.
Available on Amazon
John Alton on IMDb
John Alton on Wikipedia
Tribute to John Alton at the ASC
How did John Alton’s background influence his cinematography techniques?
John Alton’s diverse international experience, including work in Europe and Argentina, greatly influenced his unique approach to cinematography. His exposure to different cultural aesthetics and lighting conditions around the world contributed to his innovative techniques, particularly in creating mood and atmosphere in film noir.
What specific camera equipment did John Alton prefer to use?
While “Painting with Light” doesn’t focus on specific camera models, Alton was known for his mastery of the Mitchell BNC camera, popular in Hollywood during his era. He often preferred using wider-angle lenses to create depth and drama in his shots, particularly in film noir productions.
How did Alton’s techniques differ from other cinematographers of his time?
Alton’s techniques were distinguished by his bold use of shadow and minimal lighting setups. Unlike many of his contemporaries who used high-key lighting, Alton embraced low-key lighting and strong contrast. He was also known for his ability to create striking images with limited resources, often using practical light sources within the scene.
Did John Alton face any criticism for his unconventional approach to cinematography?
Yes, Alton’s unconventional methods sometimes met with resistance in Hollywood. Some studio executives and other cinematographers criticized his low-key lighting style as too dark or unconventional. However, this distinctive approach ultimately became his signature and contributed significantly to the film noir aesthetic.