A professional interview lighting setup is the foundation of Documentary filmmaking, setting Netflix-quality content apart from amateur productions. Whether you’re filming documentaries or corporate interviews, mastering your interview lighting setup transforms ordinary conversations into cinematic moments. The perfect blend of key light, fill light, backlight and background light creates depth and eliminates unflattering shadows, essential for creating consistent engaging interviews.
This guide explores essential interview lighting setups used by industry professionals. From location selection to light positioning, you’ll learn how to balance light intensity and incorporate practical lighting elements that achieve high-end results for both studio and location interview lighting setups. These proven methods will help you create the polished, cinematic look seen in streaming documentaries.
Table of Contents
Choosing the Right Location
Professional cinematographers know that location selection can make or break your interview lighting setup. Before setting up a single light, understanding your shooting space is crucial for achieving a polished result. A thoughtfully chosen location becomes the foundation for your entire interview lighting setup strategy.
Assessing available space
Your interview lighting setup begins with space evaluation. Documentary cinematographers carefully consider room dimensions, paying special attention to ceiling height, width, and total square footage. The key to cinematic depth (bokeh) lies in camera-to-subject-to-background separation – greater separation creates increases the depth and background blur effects.
When selecting a shooting location:
- When dealing with tight spaces, consider adjacent rooms for lighting positions
- Place subject approximately 6-feet away from camera
- Maintain minimum 6-foot distance between subject and background
- Review ceiling height for lighting fixtures, soft boxes and scrims / blacks
- Allow adequate space for equipment to be repositioned
Background Considerations
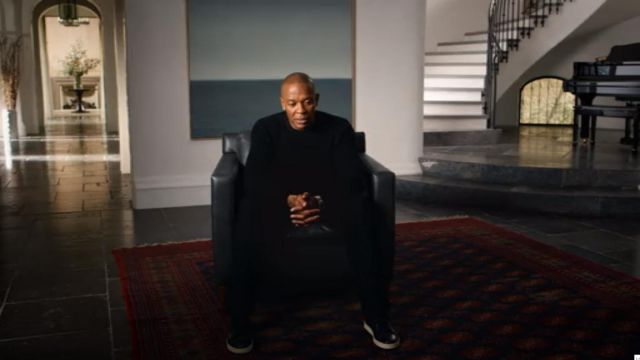
The success of your interview lighting setup depends heavily on background selection. Professional cinematographers look for backgrounds that provide story context for the interview, enhance production value while avoiding common problems:
- Evaluate texture and contrast variations
- Check for problematic reflective surfaces
- Assess depth and dimensional possibilities
- Consider color harmony with subject
- Look for opportunities to add practical sources
Managing Ambient Light
Understanding existing light conditions is crucial for any professional interview lighting setup. Documentary cinematographers must decide whether to work with or control ambient sources:
- Natural window light
- Existing Fluorescent, Incandescent or LED fixtures
- Internal Practical lights
- External architectural lighting
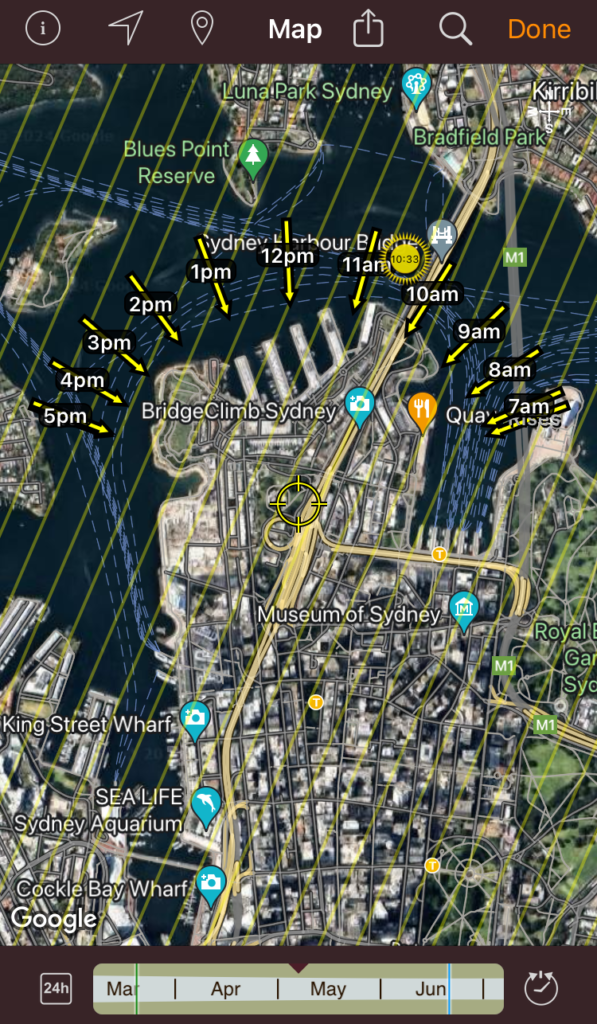
Natural light requires particular attention in planning your interview lighting setup. Professional cinematographers track changes to intensity and direction of the Sun throughout the day. For locations with large windows, consider:
- Schedule the optimal time to shoot a scene based on the sun’s position
- Weather impact assessment
- Color temperature management
- Light control options
- Supplementary lighting needs
Professional Cinematographers recommend starting with background exposure assessment before adding more lighting elements. This method creates a baseline for your interview lighting setup and ensures balance between ambient and artificial light sources.
If possible, scout locations in advance. This allows you to identify possible challenges and have options available that don’t affect your shoot schedule or the quality of your interview lighting setup. For documentary Cinematographers, a thorough location assessment helps minimise resources and setup time, while maintaining high production standards.
Setting Up Your Key Light
The key light forms the foundation of any professional interview lighting setup. As the primary source of illumination, it shapes your subject’s appearance while determining background separation. The position of your key light balances subject prominence and scene depth, adapting to both location constraints and story requirements.
How to Position Your Main Light Source
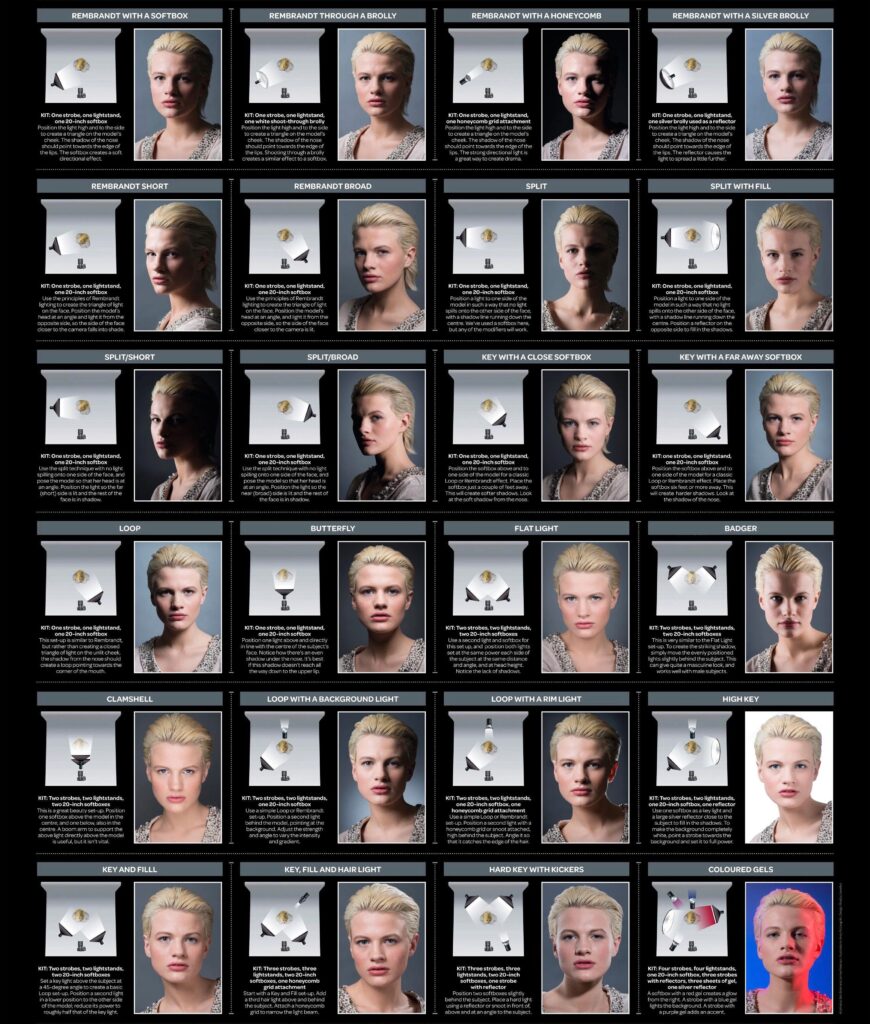
Your interview lighting setup begins with placement of the key light. Position your key light 45 degrees horizontally from the subject and 30-45 degrees above eye level. These angles create natural shadows that add depth and define facial features. The distance of the light affect shadow quality – closer placement wraps light around the face, while greater distance creates define shadows.
Choosing modifiers
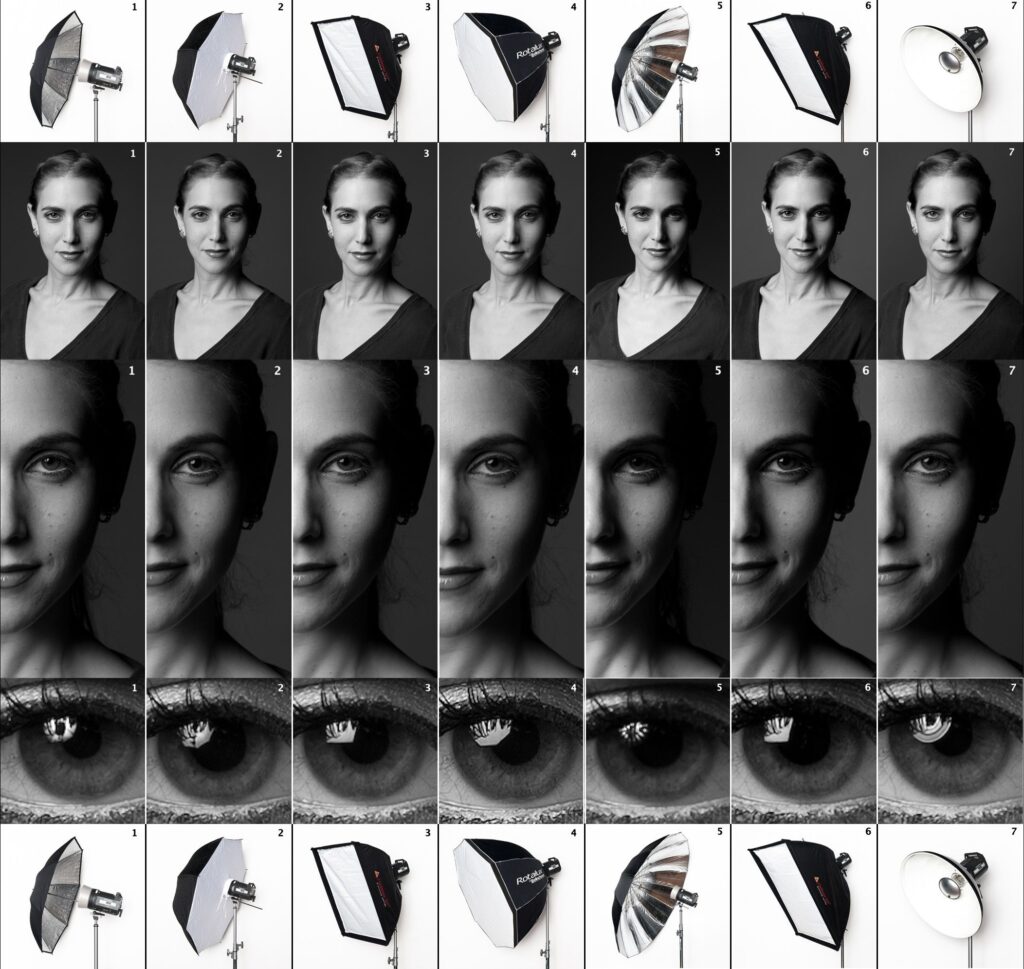
For professional interview lighting setups, softboxes or fabric silks provide even, diffused illumination that replicate window light and provide a more flattering look. Softbox sizes range from 32 inches for single subjects to 150 inches for groups, while industry-standard 8’x8′ white silks offer broader coverage with finer diffusion control. Softbox Internal baffles add softness, while egg crates (or light control grids) control light spread and spill. For maximum softness, combine both by placing a silk in front of your softbox. Your choice will depend on your room’s space and the area you need to light.
Adjusting intensity and direction
Controlling the intensity and direction of the key light allows you to balance contrast and eliminate harsh shadows or flat lighting. Your key light should be bright enough to make the subject pop from the background while maintaining the scene ambiance. Match intensity and direction with available light for to motivate the lighting source for an authentic look.
- Position the key light and set its brightness based on subject and mood
- Check how shadows form on the subject’s face
- Adjust distance and angle until coverage looks right
- Use dimming controls to fine-tune brightness, balance with ambient light
- Review on monitor
Set your key light one stop above ambient level for a natural separation. Modern LED lights offer precise dimming from 0.1-100% and colour temperature control from 2700-6500K, while tungsten or HMI fixtures require physical adjustment, gels or nets. The inverse square law states that doubling the distance from a light source reduces its intensity to one-quarter. This principle helps achieve more even lighting across the frame, and provide a more consistent exposure of the subject when they move within the frame.
Adding Fill Light
Fill light manipulation plays a vital role in creating professional interview esthetics. This secondary light source pairs with the key light and adds depth and dimension while keeping the illumination natural.
Determining the need for fill
Evaluate shadow depth and contrast to determine how much fill light your subject needs. Dark facial shadows across a subject’s face signal that fill light may be necessary. The right balance of fill light preserves facial definition without creating flat lighting. Things to consider are:
- Shadow density on subject’s face
- Overall scene contrast
- Background separation
- Facial definition
- Color rendition in shadow areas
Choosing the right fill light technique
Your choice of fill light shapes the mood of your interview. Fill light comes in three forms: Passive fill (reflected) creates a natural, documentary-like feel, Active fill (secondary source) offers creative control – using neutral or cooler colour temperatures (or RGB lights for contemporary looks), and Negative fill (controlled shadows) adds drama by removing light away from the face. Evaluate shadow depth to determine which method best suits your needs. The right balance preserves facial definition whilst staying consistency with ambient light.
The most common fill light techniques include:
- Reflector bounce: Walls, FlexFill (White, Gold, Soft Gold, Silver), White Poly boards or Neutral Gray fabrics
- Secondary light source: Positioned opposite key light.
- Negative fill: Light reflection control for increased contrast
Balancing fill with key light
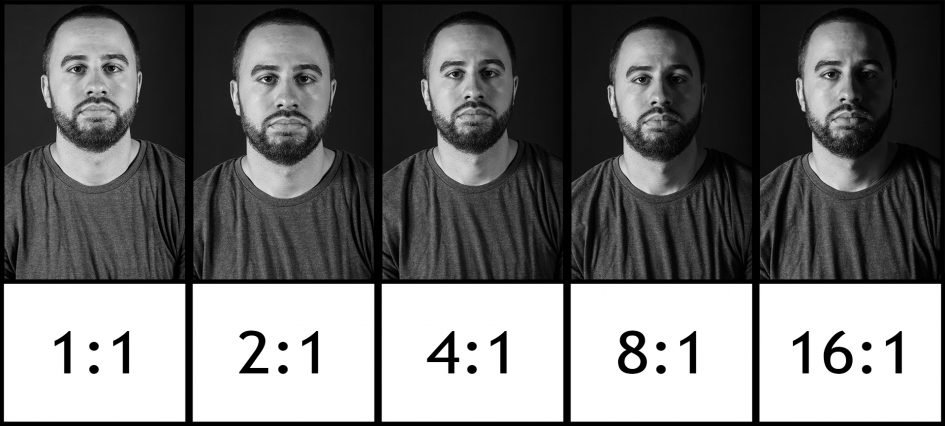
The ratio between key and fill determines image contrast and mood. Start with a 2:1 ratio – the key light is twice the intensity of the fill. This creates natural depth while maintaining clean shadows and facial detail.
| Fill Ratio | Effect | Best Used For |
|---|---|---|
| 1.5:1 | Soft lighting | Corporate interviews |
| 2:1 | Natural balance | Standard interviews |
| 4:1 | Dramatic contrast | Documentary style |
| 8:1 | Strong shadows | Moody narratives |
Position your fill source (Passive, Active or Negative) between 45-90 degrees from the subjects eyeline, adjusting the angle and light spread to control shadow lift and prevent light bleed. Keep fill intensity lower than key, using soft diffused light to lift shadows without creating additional ones. Tube lights in a vertical orientation are excellent sources for fill light.
Cinematographers adjust fill light based on these factors:
- Subject’s facial features
- Desired emotional effect
- Technical requirements
- Available space constraints
The fill light’s quality shapes the final image. Diffusion materials and specialized modifiers create soft, wrapping light that fills shadows without creating obvious secondary sources. Reflectors help bring out detail in shadowed areas while keeping natural contrast levels in natural light setups.
Whether using diffused active sources, negative filll for contrast, or reflectors for passive fill, light quality determines how naturally shadows lift or deepen. Each method offers distinct control over shadow detail while adapting to location constraints.
Incorporating Backlighting
Backlight plays several crucial roles in interview setups. Also called hair light, rim light, or edge light, this illumination separates subject from background while adding three-dimensional depth. For enhanced hair detail, combine edge lighting with additional hair fills – using either large soft sources or multiple small hard sources from different angles. This layered approach creates natural definition and accentuates hair texture. Professional cinematographers use these techniques to achieve the “cinematic look” in documentary and corporate interviews.
Understanding the purpose of backlighting
Backlight placement affects both subject modelling and scene atmosphere. The quality and direction of your edge lighting influences how viewers connect with your subject. Additional fills shape hair detail and form – from subtle definition to dramatic modelling – contributing to your interview’s emotional impact.
The backlight’s main functions include:
- Creating subject-background separation – lifting dark clothing from shadows, popping subjects from busy backgrounds, and defining edges against bright windows
- Adding depth and dimension to the frame – transforming flat subjects into sculptural forms, building depth between subject and background
- Highlighting subject contours – revealing the shape of shoulders, emphasising jawlines, accentuating facial structure
- Enhancing hair and shoulder definition – adding life to hair through multiple angles, creating shoulder definition, revealing texture in clothing
- Defines scene mood – strong edge light for drama and authority to soft, wrapped sources for intimacy and approachability
Positioning backlight sources
The backlight position determines how well your subject stands out from the background. Height is crucial – higher angles illuminate the top of the head and hair nicely, but watch for unwanted spill onto forehead and nose. Lower placement creates stronger rim definition with shadows across the top of the head. Your frame size affects positioning too – tighter shots need lower placement for subtle edge, while full-body shots require greater height to keep rigging out of frame and greater light control to prevent unwanted spill.
Maintain 45 degrees behind subject for clean separation while controlling flare. You’ll often need sophisticated rigging solutions like heavy-duty stands, boom arms, or overhead grids. When rigging options are limited, rolled Flex panels or LED tubes offer a lightweight solution that combines edge lighting with subtle fill.
Controlling spill and flare
Professional backlight implementation depends on proper light spill control. Cinematographers need to manage scattered light to keep image quality high and avoid distracting artifacts. Hard-edge accessories like flags and barn doors help control light spread with precision, while soft-edge devices create smooth light fall-off where needed.
Controlling backlight spill and flare is crucial for clean interview lighting setups. Control spill and flare using flags, barn doors, and grid systems to prevent artefacts that can ruin your shot. Protect your lens from flare by adding a matte box or setting up flags in front of the camera.
Here’s what works well for controlling your backlight:
- Solid flags and cutters to block spill onto walls, the set or lens
- 4-way barn doors for beam shaping – feather edges into shadows
- Egg crates or Honeycomb (40°, 30°, or 20°) to control spread and prevent background contamination
- Light diffusion materials (216, 250, Hampshire) to soften hard sources
- Single, double or light black nets to reduce intensity while maintaining edge
- Translucent flags (silk, grid cloth) for subtle edge control
- Camera-mounted matte box or flag setup to eliminate lens flare while maintaining edge
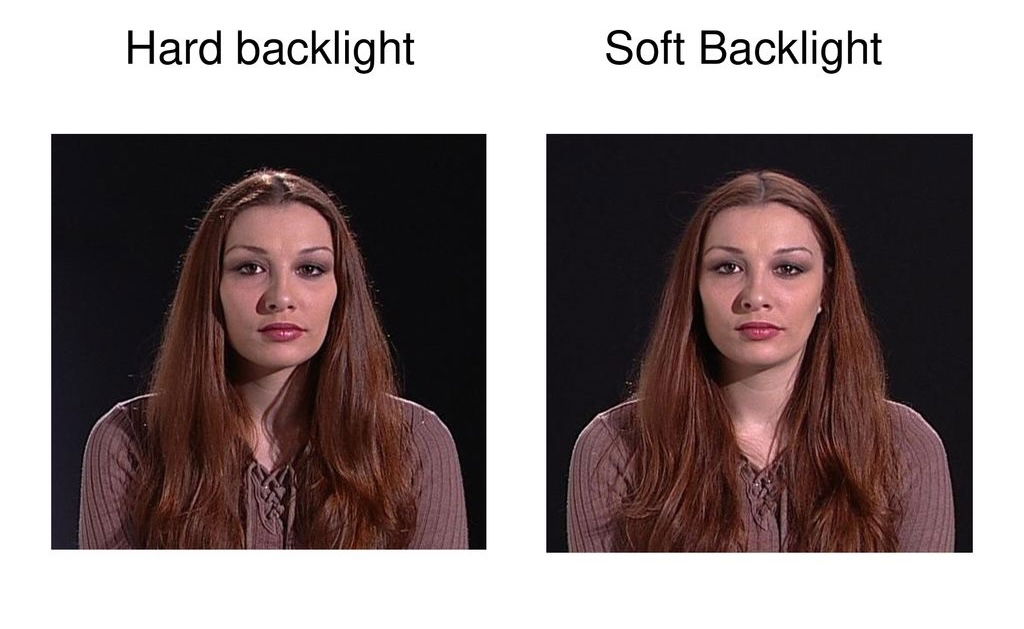
The way you control backlight quality defines your subject’s presence in frame. Add diffusion when your backlight feels too harsh – it’ll soften edges and eliminate hot spots on ears and faces. For natural light as backlight, expose carefully to maintain clean separation without blowing out edges.
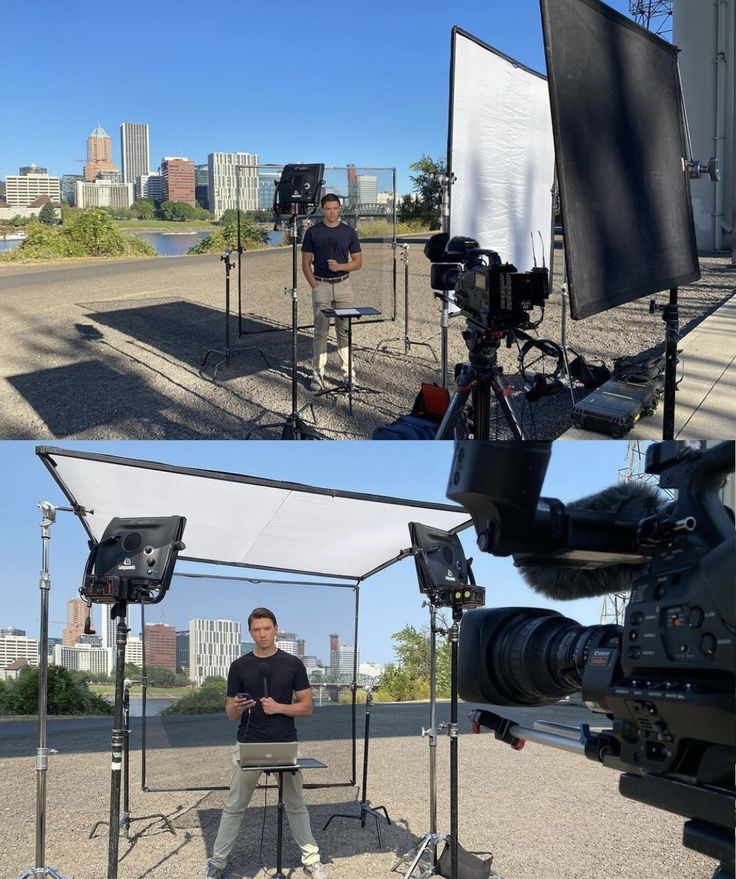
Natural light can be used as backlight for your interview lighting setup. Position your subject back towards the sun while managing its intensity through diffusion or nets. As sunlight moves and changes throughout the day, adjust your subjects position or control the light to maintain a consistent separation. Always have artificial sources ready when clouds interrupt your natural backlight.
Your interview lighting setup needs consistent colour temperature throughout the interview, especially when there are multiple backlights illuminating the subject. Whether mixing LED with tungsten sources, or balancing artificial light with daylight, matching your colour temperatures will avoid distracting edges. Control unwanted colour contamination by covering windows or correcting artificial sources to match.
Balance your backlight intensity carefully with the rest of your interview lighting setup. An overexposed edge pulls attention from your subject’s face, while too little separation flattens the image. When using windows as backlight, control bright exteriors with neutral density gels or nets on the glass. Single or double black nets reduce intensity while maintaining natural light quality, while ND gels offer stronger exposure control when needed. Find the right balance where your eye naturally settles on the subject’s face while maintaining dimensional depth.
Background Lighting
A well-crafted interview lighting setup needs thoughtful background treatment. Shape depth and visual interest through patterns, texture, and light gradients that complement your subject without stealing focus.
Creating Depth with Light Patterns
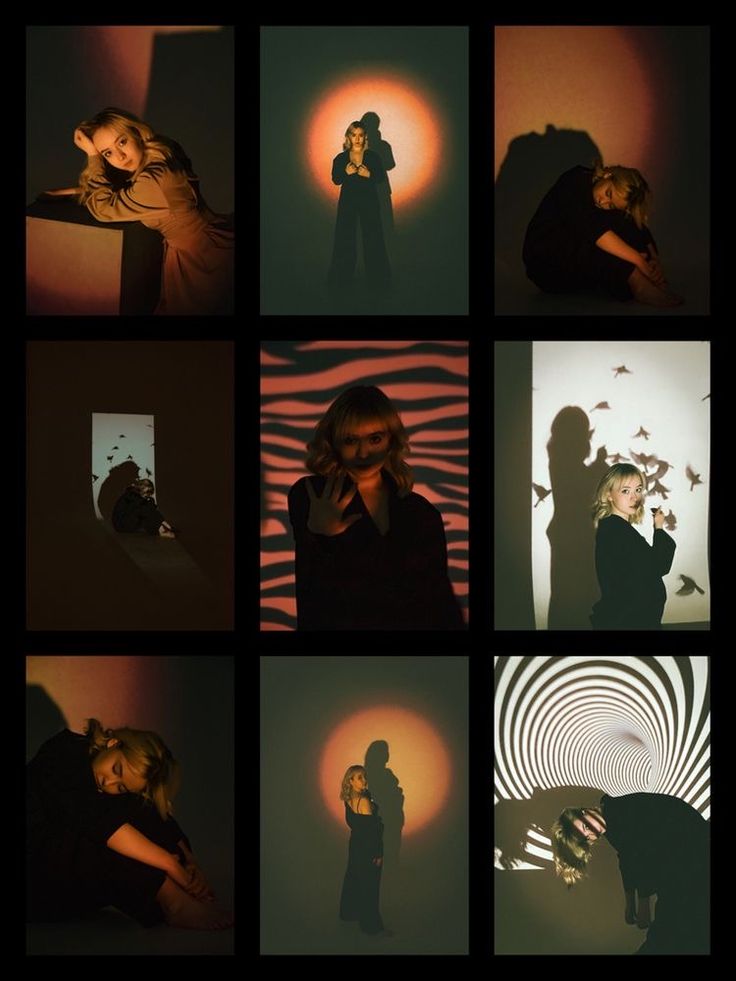
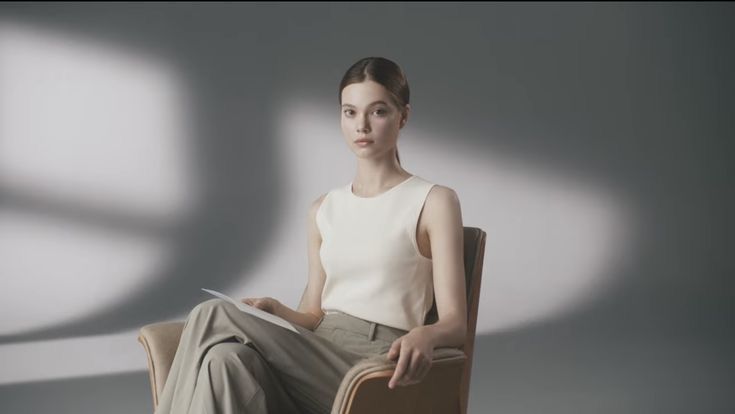
Gobos (go-betweens) transform ordinary lighting into interesting background elements for your interview lighting setup. The Stencilled patterns are placed in front of lights to create controlled shadows and highlights that add texture and depth to walls and backgrounds. Professional cinematographers often layer multiple gobo patterns at different intensities, creating subtle depth that draws the viewers interest without overwhelming the frame. Common patterns include organic shapes like leaves and abstract geometric designs that suggest architecture or window light.
Pattern Selection for Different Styles
Corporate and business interviews benefit from architectural patterns that suggest windows or modern office environments. These structured designs create a professional atmosphere while maintaining visual interest. Subtle geometric patterns and shapes work particularly well, as they add texture without drawing attention away from the subject.
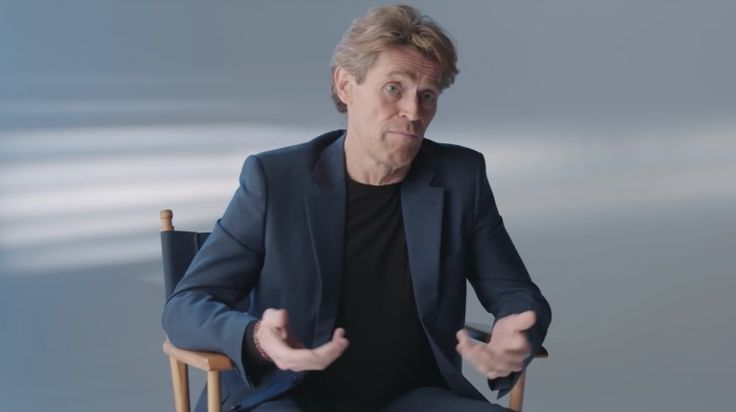
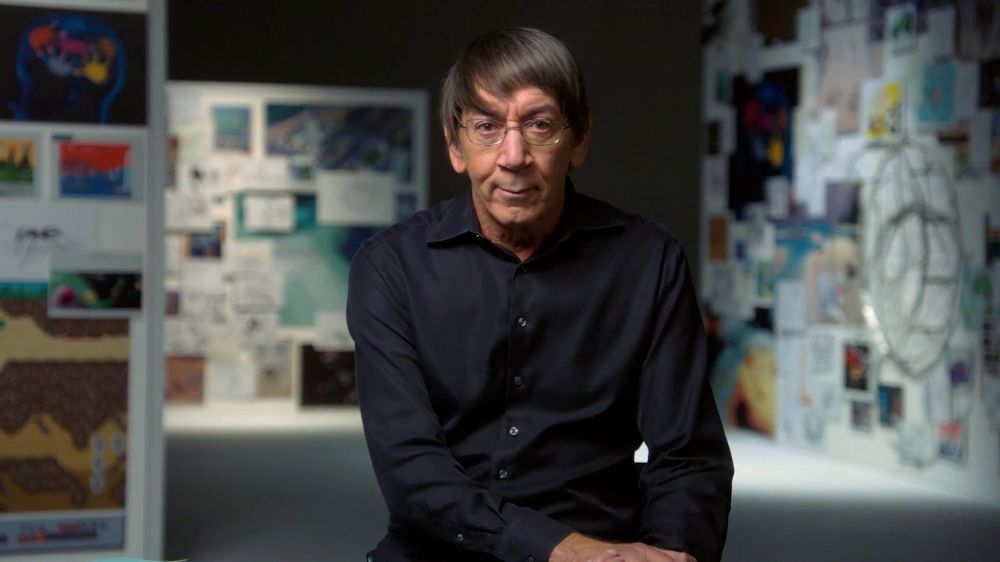
Documentary interviews require background lighting that feels authentic to the subject’s space. Rather than adding artificial patterns, enhance existing elements like natural window light, plant shadows, or architectural features. This approach maintains documentary authenticity while creating depth that doesn’t feel manufactured.
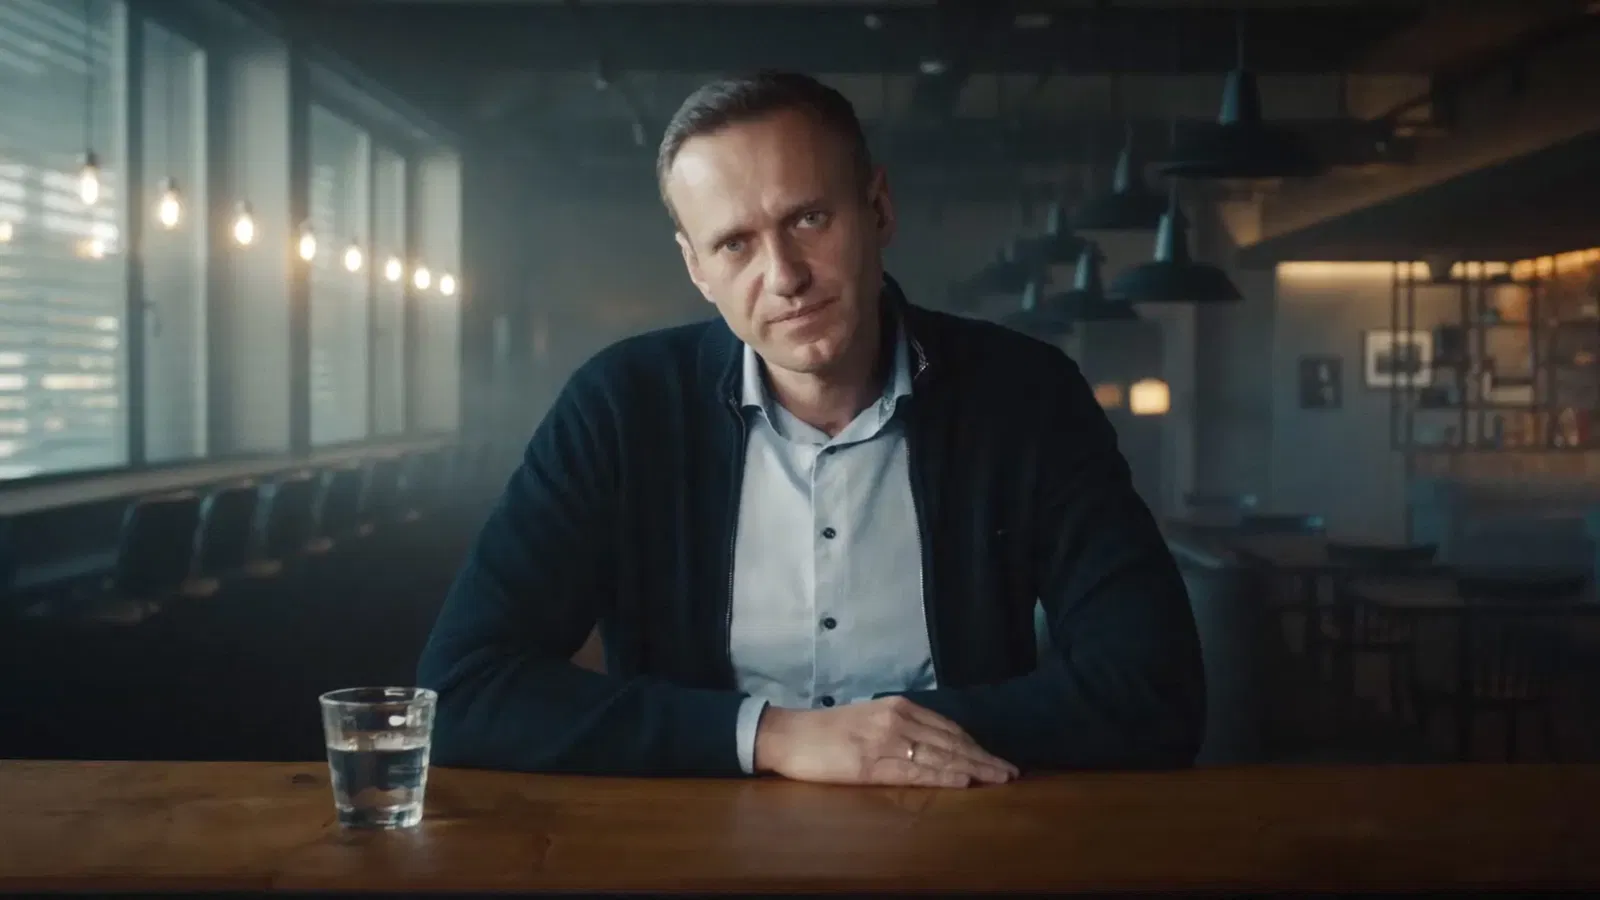
Creative and artistic interviews can embrace bolder pattern choices in your interview lighting setup. Overlapping multiple designs creates unique textures that reflect artistic expression. These settings allow for more dramatic use of light, colour and shadow, though careful attention must be kept to prevent patterns from overwhelming the subject.
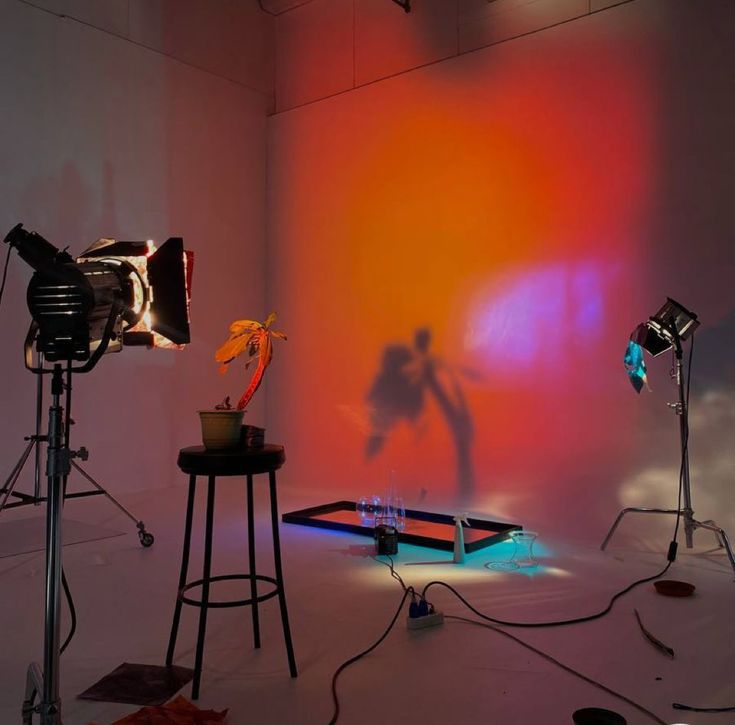
Shape your background with accent lights – whether sharp ‘slashes’ or soft ‘blobs’ of light. Create these using barn doors, snoots, aspherical lenses or flags to break up flat surfaces. These intentional accents add compositional lines and depth to your interview lighting setup. Control their angle and intensity using flags or lens adjustment, being careful to enhance rather than distract from your subject.
Working with Practical Sources
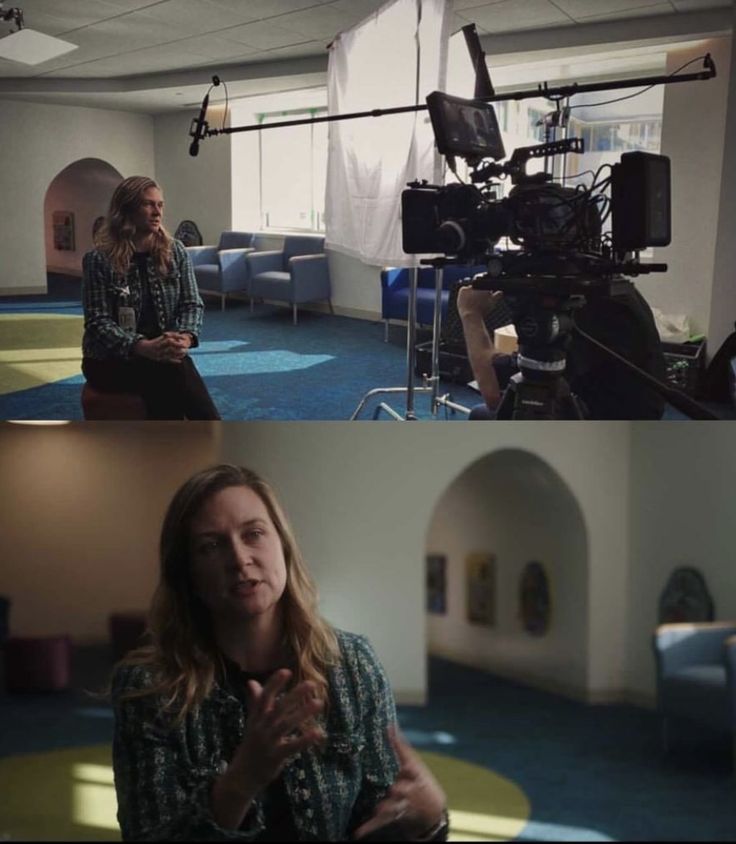
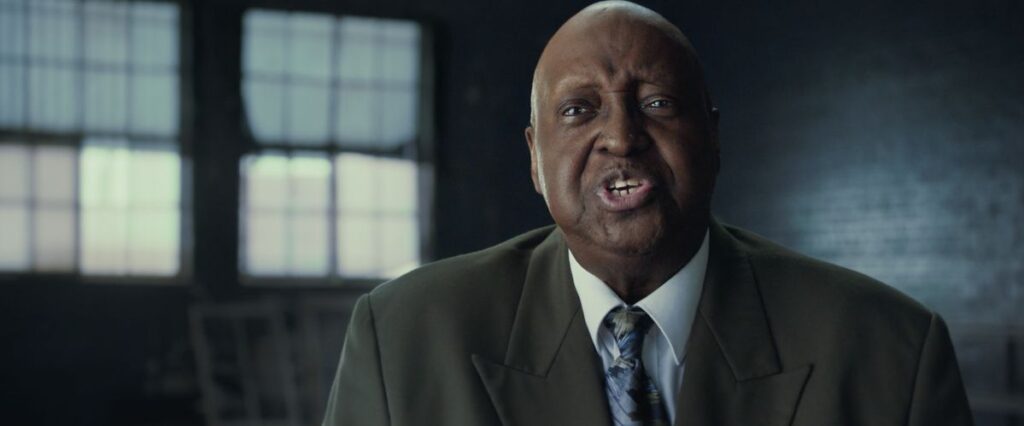
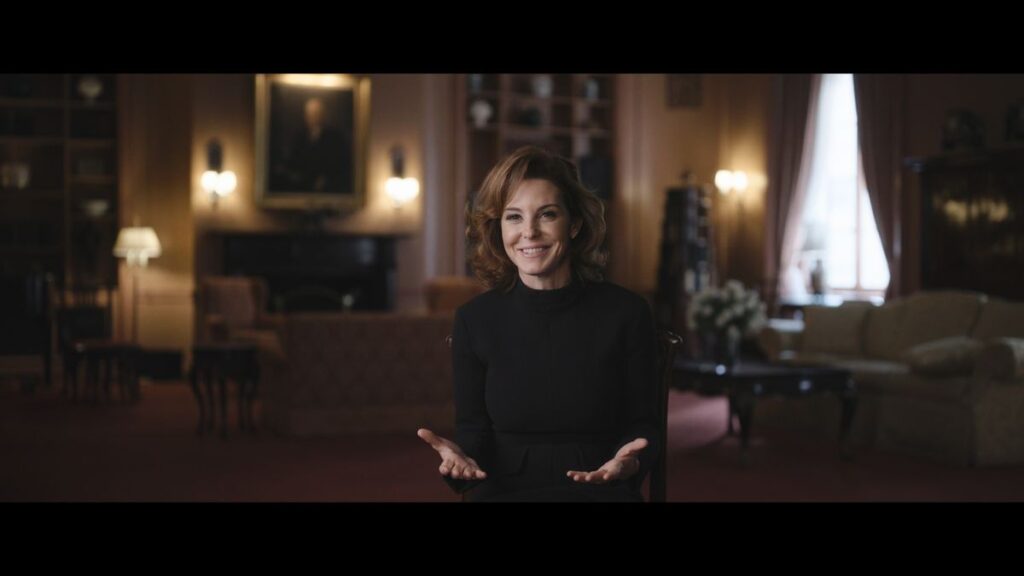
Your interview lighting setup needs to work harmoniously with practical sources visible in frame. Enhance window light with subtle patterns to extend natural shadows, or build depth around practical lamps by coordinating additional pools of light. These layers create authentic dimension while maintaining the room’s natural feel.
Balance is crucial in any interview lighting setup – your background should support your subject without fighting for attention. Monitor the relationship between practicals and background accents through your viewfinder, adjusting intensity and spread to maintain focus where it belongs.
Fine-tuning with Practical Lights and Atmospheric effects
Your interview lighting setup takes on new life when incorporating practical sources. These visible lights do more than illuminate – they build credibility and enhance storytelling through their familiar presence. Thoughtful integration of practicals creates environments that feel authentic to viewers.
Integrating existing light sources
Begin your interview lighting setup by evaluating practical sources at the location. Window light, desk lamps, overhead fixtures, and architectural elements all affect your scene’s character. Understanding each source’s contribution helps shape your lighting.
Common practical sources serve specific roles:
- Window light provides natural motivation – match artificial lights to its direction and quality
- Floor and table lamps visible in frame create natural depth, while justifying the direction of your background and edge lights
- Overhead fixtures establish base ambience – either work with them or flag them off with tape or black wrap (cinefoil) depending on your desired look
- Architectural lighting like wall sconces or cove lights define space and create natural motivation for background illumination
- Display screens (computers, TVs, monitors) generate subtle ambient glow that can motivate eye lights or background accents
Consider how each practical source affects your interview lighting setup. Pay attention to intensity, color temperature, and position relative to your subject. Window light often becomes the foundation, naturally motivating your key light direction and establishing environmental authenticity.
Adding motivated lighting elements
Your interview lighting setup becomes more authentic when motivated by practical sources. Use visible lights within frame to justify your overall lighting choices, creating environments that make visual sense to viewers.
Each practical source provides natural motivation for your lighting choices:
- Windows justify daylight-balanced key direction
- Desk lamps motivate warm edge lights
- Overhead fixtures explain soft top light
- Computer screens provide cool accent glow
Apply these principles when building your interview lighting setup:
- Position the key light to match window direction
- Add edge lights motivated by background practicals
- Create depth through layered lighting intensities
- Establish color contrast between practical sources
Build depth by layering these motivated sources. Position your key light to match window direction, add edge lights that appear to come from visible practicals, and create dimension through varied intensities. Watch how shadows fall – they should make sense given the visible sources in your frame.
Balancing practicals with interview lighting
Your interview lighting setup requires careful balance between practical sources and key light. Create harmony through precise control of exposure and color temperature while maintaining consistent skin tones.
Start by choosing your base colour temperature on camera – either daylight (5600K), neutral white (4300K) or tungsten (3200K). Then shape other sources through filtration or electronic control to match. Modern LED practicals offer unprecedented flexibility, allowing precise adjustment of colour and brightness while remaining visible in frame.
To maintain consistency in your interview lighting setup:
- Set your camera’s white balance to match key light temperature, providing a solid baseline for skin tones
- Control practical light intensity through dimmers, switched circuits, or diffusion materials like 216 or ND gels
- Manage spill from practical sources using flags, barn doors, or cutter placement – prevent unwanted contamination of your subject
- Balance background exposure against subject illumination, typically 1-2 stops under key to maintain focus
- Keep color temperature consistent across main light sources, especially those affecting skin tones
Your interview lighting setup needs careful balance between practical and key light exposure. Background practicals can sit 1-2 stops over key to maintain depth while not taking focus away from the subject. Achieve this through:
- Position practicals where they naturally occur, considering their influence on both subject and background
- Control intensity through dimming or distance until practicals enhance rather than dominate
- Apply ND gels on bright sources to reduce intensity while preserving natural appearance
- Use LED dimming for precise output and colour matching
Create depth in your interview lighting setup through intentional colour contrast from practicals. Combine warm tungsten fixtures with daylight-balanced key light for natural sophistication. Documentary interviews benefit from this authentic mix of colour temperatures, reinforcing the reality of your subject’s space.
When using window light, watch for changing intensity throughout the day. Supplement with artificial sources matched to maintain consistent exposure in your interview lighting setup, preserving the natural quality while ensuring reliable results.
Enhancing Depth with Atmosphere
Adding haze to your interview lighting setup reveals the sculptural quality of light. Research shows controlled atmosphere increases perceived depth by up to 40%, while making light beams visible to camera. Unlike theatrical smoke, water-based hazers are ideal for interview environments, providing a subtle, consistent density that enhances your lighting without compromising subject comfort.
Control atmosphere in your interview lighting setup through:
- Reduce key light intensity by 1/2 to 1 stop as haze amplifies visibility – watch exposure on faces and adjust until light beams become visible without overpowering
- Position fans strategically behind camera and at room corners for even distribution – gentle circulation maintains consistency without creating visible air movement
- Use continuous-flow hazers set to low output – modern units provide steady atmosphere without the disruptive bursts of traditional hazers
- Balance practical source interaction carefully – each light source becomes more prominent as its beam cuts through the haze
Modern hazers maintain stable density through constant low output, eliminating the visible bursts and noise of traditional units. This matters during interviews where audio quality is crucial. Watch how practical sources interact with the atmosphere – their beams become visible elements that add natural depth to your frame.
Your interview lighting setup reaches new levels through the interplay of practical sources and atmospheric effects. Visible lights shape both exposure and environment, while controlled haze reveals their beams and deepens space. This combination of practical control and atmospheric density creates natural dimension that serves both technical and creative needs.
Conclusion
Professional interview lighting setups require understanding how technical elements work in harmony. You need to place key, fill, and backlights strategically to create depth while keeping a natural look. Practical light sources and atmosphere add environmental authenticity and turn basic setups into cinematic scenes. Your choice of modifiers, colour temperature, and exposure create depth that feels authentic to your location.
Whether filming documentaries, corporate pieces, or broadcast content, thoughtful execution of your interview lighting setup ensures consistent, repeatable results. By understanding these core principles and their creative application, any team can achieve professional-quality lighting that enhances subject presence while preserving location context.
How do you arrange lighting for an interview?
To set up lighting for an interview, begin with your main light source, known as the key light. Position it at an angle of 30 to 45 degrees to the right or left of the interviewee and elevate it to about 30 to 45 degrees above the subject’s eye level. You can use studio lights alone or in combination with natural light.
What constitutes a 3-point lighting setup for interviews?
A 3-point lighting setup for interviews typically includes three main light sources: the key light, the fill light, and the backlight. Each light serves a specific purpose and can be adjusted in angle, intensity, and color to achieve the desired effect.
What is the ideal type of lighting for a formal interview?
For formal interviews, diffused light is generally the most flattering. It softens the lighting on the subject, reducing harsh shadows and contrast. You can achieve diffused lighting by using modifiers like a softbox, an umbrella, or even a large white sheet, although using a sheet is not advisable with hot lights.