Drone cinematography has redefined filmmaking, making stunning aerial shots accessible to everyone, from amateur creators to professional cinematographers. From sweeping landscapes to high-energy action sequences, drones offer a fresh perspective and a new way to capture captivating visuals. With advancements in drone technology, it’s easier than ever for enthusiasts and experts alike to create remarkable drone footage.
This guide covers the essentials of drone filming, including selecting the right equipment and mastering advanced techniques. Whether you’re just starting out with a DJI drone or looking to enhance your skills in aerial videography, this article provides practical insights to improve your drone shots and elevate your Cinematography.
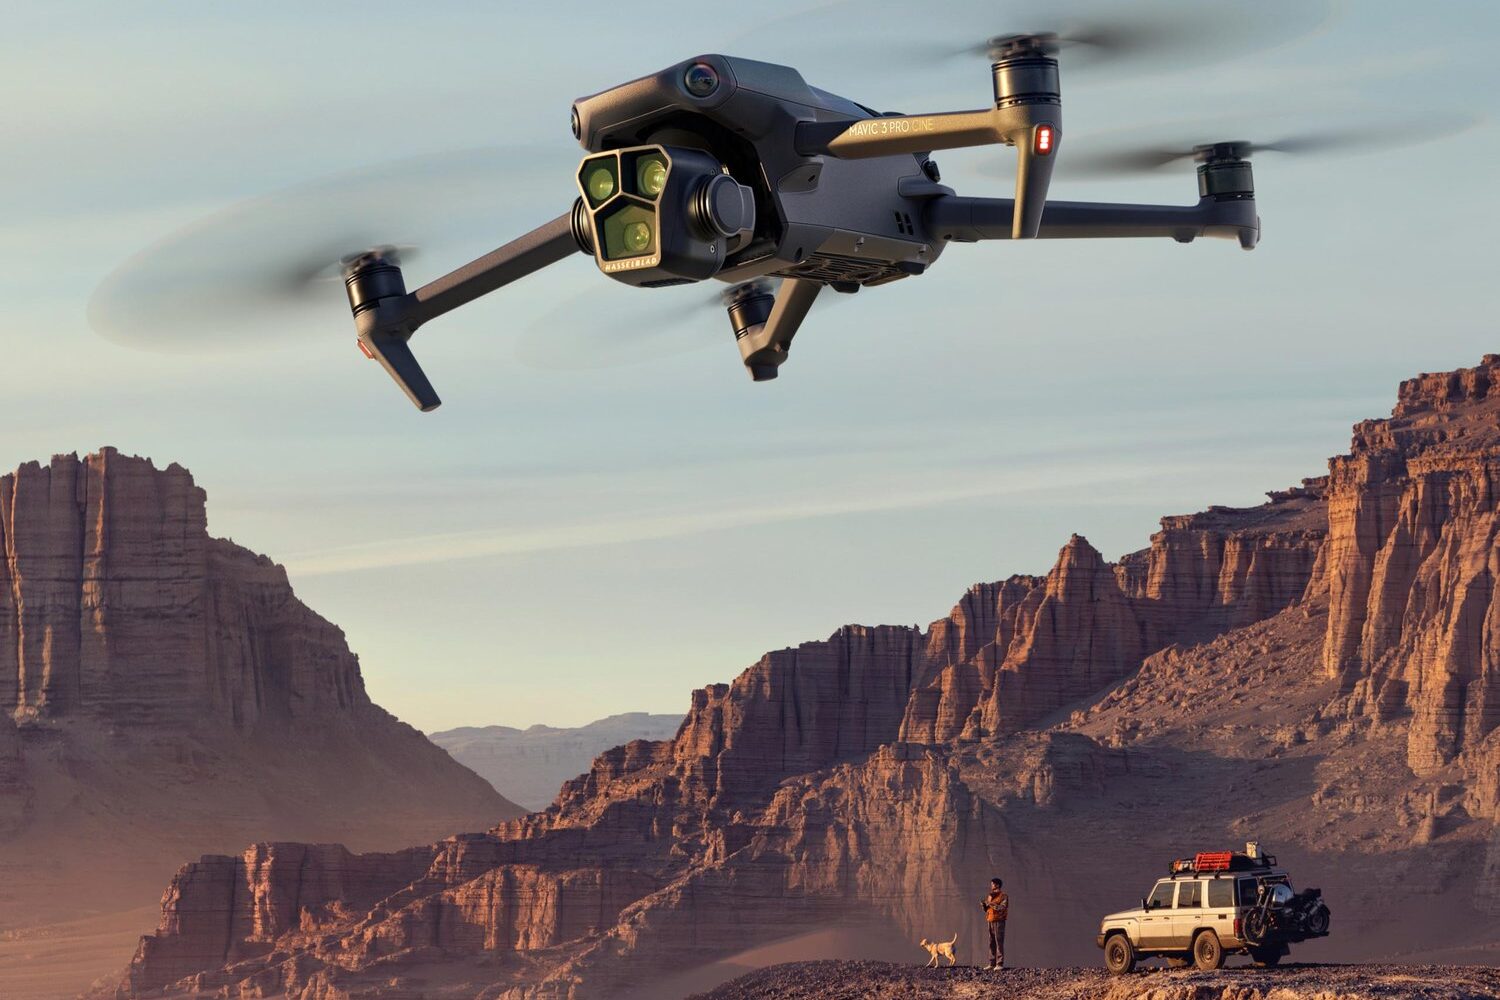
Table of Contents
Choosing the Right Drone for Cinematic Shots
Selecting the appropriate drone is crucial for achieving your cinematic vision. With a myriad of options available, it’s important to consider factors that will directly impact the quality and versatility of your drone shots.
Camera Quality
When selecting a drone for cinematic shots, camera quality is paramount. Look for drones equipped with high-resolution cameras capable of shooting in 4K or even 8K. The DJI Mavic 3 Pro Cine, for instance, boasts a powerful triple-camera system with a 20-megapixel main sensor. Consider features like adjustable aperture, ISO, and shutter speed for greater control over your aerial footage. Larger sensors generally perform better in low-light conditions, crucial for capturing golden hour shots. Remember that payload affects flight performance, so balance camera capabilities with your drone’s weight and power. Some professional setups allow for interchangeable lenses, offering even more creative flexibility in your aerial videography.
Flight Time
Battery life is a critical factor in drone cinematography. Longer flight times allow for more extended shooting sessions and increased flexibility in capturing the perfect shot. The DJI Air 3, for example, offers an impressive battery life of up to 46 minutes, enabling prolonged high-quality drone shots. Always keep spare batteries handy and plan your filming schedule strategically to maximise your airtime. Additionally, ensure you comply with CASA’s battery management regulations, which cover safe transportation and handling procedures.
Portability
For versatile drone videography, especially when shooting on location, portability is key. Foldable designs like the DJI Mini 4 Pro, weighing under 249 grams, are ideal for travel and can be easily carried in a jacket pocket. However, balance portability with the drone’s capabilities. owever, it’s crucial to strike a balance between the drone’s size and its capabilities; larger drones might provide more stability and better camera quality but can be cumbersome to transport. Consider CASA’s weight categories when selecting your drone, as they impact licensing requirements and operational limitations. The DJI Mavic 3 Pro is a good compromise, as its foldable design offers portability without sacrificing performance, making it suitable for professional-quality footage on the go.
Intelligent Features
Advanced flight modes can significantly enhance your drone videography. Features like waypoint navigation, obstacle avoidance, and automated flight paths allow for complex aerial shots while improving safety. The DJI Mavic 3 Pro offers excellent obstacle avoidance capabilities and includes features like subject tracking and automated flight modes. These intelligent features can help create smooth, professional-looking aerial footage with minimal pilot input. The Autel EVO Lite+ is another drone that stands out for its intelligent features, offering a 1-inch sensor camera with 5.4K video capabilities. However, always be prepared to take manual control and understand CASA regulations regarding automated flight functions to ensure safe and legal drone operations.
When choosing a drone, carefully consider how each model’s specifications align with your project needs. Remember, successful aerial shooting depends not only on the equipment but also on the operator’s skill and knowledge.
Pre-Flight Checklist and Safety Measures
Safety and preparation are essential to drone cinematography. A thorough pre-flight routine not only ensures compliance with regulations but also prepares you for capturing high-quality drone shots.
Battery Check
Proper battery management is crucial for safe and successful drone cinematography. Before each flight, ensure your batteries are fully charged and in good condition. Implement a pre-flight battery check routine, including visual inspection for any signs of damage or swelling. Use a battery health monitor to track the overall condition of your LiPo batteries over time. CASA mandates specific procedures for transporting and handling drone batteries, so familiarize yourself with these regulations. During flight, constantly monitor your battery levels and set return-to-home thresholds conservatively. Remember, cold temperatures can significantly reduce battery performance, so take this into account when planning your aerial shots in various weather conditions.

Propeller Inspection
Damaged propellers can lead to catastrophic failures mid-flight, compromising both your safety and your expensive equipment. Conduct thorough pre-flight propeller inspections, checking for cracks, chips, or deformities. Even minor damage can affect flight stability and the quality of your drone shots. Replace propellers at the first sign of wear or damage. Some drones, like the DJI Mavic series, use quick-release propellers for easy replacement. Establish a routine inspection schedule and keep a log of propeller changes. Consider carrying spare propellers in your drone kit for field replacements. Remember, propeller balancing is crucial for smooth, vibration-free aerial shots, so learn how to properly balance your props or invest in pre-balanced options.
Calibration
Accurate sensor calibration is essential for precise flight control and stable aerial footage. Calibrate your drone’s compass and IMU (Inertial Measurement Unit) before each flying session, especially when changing locations. Follow your drone’s specific calibration procedures, which often involve rotating the drone on different axes. Pay attention to any calibration warnings from your drone’s app or controller. Environmental factors like magnetic interference can affect calibration, so be mindful of your surroundings. Some advanced drones offer auto-calibration features, but manual calibration is often more reliable. Proper calibration ensures your drone responds accurately to control inputs, crucial for executing complex aerial maneuvers and maintaining steady shots in challenging conditions.
Weather Assessment
Weather conditions significantly impact both drone performance and footage quality. Before each flight, check wind speed, precipitation chances, and visibility. Use reliable weather apps designed for drone pilots, which often provide detailed forecasts including wind speed at various altitudes. CASA imposes specific weather limitations for RPAS operations, so ensure you’re familiar with these regulations. Be particularly cautious of gusty conditions, which can make controlling your drone and capturing smooth aerial footage challenging. Remember, rapidly changing weather can affect your drone’s performance and battery life, so always be prepared to cut your shoot short if conditions deteriorate.
By ingraining these safety measures and pre-flight checks into your routine, you create a foundation for successful and responsible drone operations. With safety addressed, we can now focus on the creative aspects of drone cinematography.
Fundamental Drone Shots for Beginners
Developing a solid foundation in basic drone shots is essential for enhancing your operating skills. These basic techniques form the building blocks for more complex and creative compositions.
Reveal Shot
The reveal shot is a stunning way to introduce a scene, building anticipation and awe. To execute this shot, start with your drone close to an object or the ground, then slowly ascend or move backwards while tilting the camera. This technique works particularly well over water or when approaching landscapes with dramatic features. Practice smooth control inputs to achieve a cinematic feel, using your drone’s intelligent flight modes if available. Experiment with different speeds and angles to find the most impactful reveal. Remember to maintain visual line of sight (VLOS) as required by CASA regulations, and always be aware of your surroundings as you execute these type of drone shots.
Fly-Through
Fly-through shots add a dynamic narrative element to your footage, connecting different parts of a location to give viewers a sense of journey. Maintain a consistent speed and altitude to ensure stability as you navigate through your chosen path. Carefully plan your route to avoid obstacles and adjust for lighting variations. Although your drone’s obstacle avoidance feature can be helpful, always be ready to take manual control to ensure safety. These shots are particularly striking in urban settings or to highlight architectural details. Remember to scout your location thoroughly and adhere to CASA’s regulations concerning drone operation near structures.
Top-Down
Top-down shots provide a unique perspective, often revealing patterns and designs hidden from ground-level views. Whether you’re capturing the organized chaos of urban planning or natural geometries, adjusting your altitude can help find the perfect composition. Make sure your drone’s camera settings are adjusted for bright conditions and consider using a polarising filter to minimise glare and enrich colours. Stay within CASA’s maximum altitude of 120m (400′) Above Ground Level (AGL) and be aware of your surroundings, including other aircraft that may be operating in the area.
Orbit
Perfect circular shots around a subject by using your drone’s point of interest mode or manual controls. Orbits add a sense of grandeur and context to your subject, whether it’s a building, natural feature, or event. Vary the altitude and radius of your orbit for diversity. When using automated flight modes, ensure compliance with CASA regulations and always be prepared to take manual control if necessary. Practice smooth yaw control for manually executed orbits.
Experiment with different orbit speeds to create varying effects – slower orbits often feel more cinematic. Consider combining orbits with other movements, like ascending or descending, to add even more dynamism to your aerial shots. Always maintain awareness of your drone’s position relative to the subject and surrounding obstacles.
These fundamental shots provide a solid foundation for your drone cinematography journey. As you become more comfortable with these basics, you’ll be ready to explore more advanced techniques and push your creative boundaries.
Advanced Drone Techniques for Pros
For experienced drone pilots looking to elevate their cinematography, advanced techniques open up new possibilities for creative expression. These methods require precision, practice, and a thorough knowledge of your drone’s capabilities.
Parallax Effect
Create depth in your aerial shots using the parallax effect. This technique involves moving the drone laterally while adjusting the gimbal to keep the subject centered. The result is a three-dimensional quality to your footage, with foreground elements moving faster than the background. To execute this, fly your drone sideways while slowly panning the camera in the opposite direction. Practice at different speeds and distances to find the most effective parallax for your scene.
This technique works particularly well in environments with multiple layers of interest. Combine parallax movements with altitude changes for even more dynamic shots. Always maintain situational awareness as you focus on these complex movements, adhering to CASA guidelines for safe drone operations.
Dolly Zoom
Achieve the vertigo effect, popularised by Hitchcock, by flying towards or away from a subject while adjusting the zoom. This advanced technique requires precise control and planning. To execute a dolly zoom, fly your drone towards your subject while simultaneously zooming out, or vice versa. The key is to maintain the subject at the same size in the frame while the background appears to change dramatically. This effect works best with drones that have optical zoom capabilities, however can be achieved in post-production by digitally zooming the image. Practice this technique in open areas before attempting it in more complex environments.
Point of Interest
Utilize automated point of interest modes to capture smooth, circular footage of a subject. This technique is perfect for showcasing landmarks, events, or landscapes from multiple angles. Most modern drones offer this feature, allowing you to set a central point and radius for the drone to orbit automatically. Experiment with different angles and altitudes to add variety to your shots. Try combining point of interest mode with manual altitude adjustments for more dynamic footage.
This technique is particularly effective for real estate videography or capturing outdoor events. Remember to choose your point of interest carefully, considering background elements and potential obstacles in the flight path.
Hyperlapse
Hyperlapse combines time-lapse photography with smooth drone movement, condensing hours into seconds, creating stunning aerial sequences. Plan your flight path carefully, considering changes in lighting and subject movement throughout the duration of your shoot. Use your drone’s intelligent flight modes or waypoint navigation to ensure consistent movement for smoother results. Pay attention to your interval settings – shorter intervals create smoother motion but require more storage and battery life.
Post-processing is crucial for hyperlapse shots, so shoot in a high-resolution format to allow for stabilisation and cropping. Always monitor your drone’s position and battery levels closely during these extended shooting sessions.
These advanced techniques represent the cutting edge of drone cinematography. Perfectly these techniques will set your work apart and allow you to tackle even the most challenging aerial shooting scenarios.
Overcoming Common Drone Filming Challenges
Even the most experienced drone cinematographers face challenges in the field. Understanding common issues and how to address them is crucial for consistently producing high-quality aerial footage.
Wind Compensation
Capturing stable footage in windy conditions is a common challenge for drone cinematographers. If you’re just beginning with drones, it’s usually best to avoid operating in wind speeds above 16-25 km/h. After you get comfortable with drones, it’s fairly easy to operate in winds as high as 32 km/h. However, the real problem is not wind speed but wind gusts.
Fly into the wind when possible for more stable footage, and use higher frame rates to allow for smoother slow-motion in post-production if needed. Consider using a heavier drone with more powerful motors for better wind resistance. Practice flying in various wind conditions to improve your control skills. Use your drone’s telemetry data to monitor wind speeds at altitude. In post-production, software stabilisation can help smooth out any remaining shakiness. Always adhere to CASA guidelines on wind limitations for RPAS operations, prioritising safety over getting the shot.
Avoiding Propeller Shadows
Preventing propellers or propeller shadows from appearing in your drone shots is essential for professional-looking aerial footage. Adjust your drone’s angle and flight path to keep the sun behind or to the side of your drone. In bright conditions, use ND filters to allow for a slower shutter speed which is twice the frame rate (e.g 25fps = 1/50 shutter), reducing the likelihood of visible propeller shadows. If propellers do appear in your footage, they can often be removed in post-production using masking or cloning techniques. Always test your setup in various lighting conditions before important shoots to ensure you can consistently capture shadow-free aerial footage.
Maintaining Visual Line of Sight
Keeping your drone within visual line of sight (VLOS) is crucial for safety and legal compliance when capturing drone shots. Maximise your shooting range while maintaining VLOS, such as using a spotter or carefully planning your flight path and position yourself at the centre of the flight path. Bright LED lights on your drone can help maintain visibility in low-light conditions.
For operations requiring extended range, explore CASA’s regulations on potential Extended Visual Line of Sight (EVLOS) or Beyond Visual Line of Sight (BVLOS) operations. Always be prepared to bring your drone back immediately if you lose sight of it. Remember that atmospheric conditions like haze or glare can affect your ability to maintain VLOS, so factor these into your flight planning.
Battery Management
Efficient battery management is key to maximizing flight time for complex aerial shots. Plan your shoot to prioritise the most important shots when battery levels are highest. Use your drone’s intelligent battery features to accurately gauge remaining flight time. In cold conditions, keep spare batteries warm and fly conservatively as cold temperatures can significantly reduce battery performance. For longer shoots, consider investing in high-capacity batteries or a portable charging station.
Set conservative return-to-home thresholds and never push your drone to its absolute battery limit. Keep a detailed log of battery usage and performance to track degradation over time and ensure you’re always working with reliable power sources for your aerial cinematography.
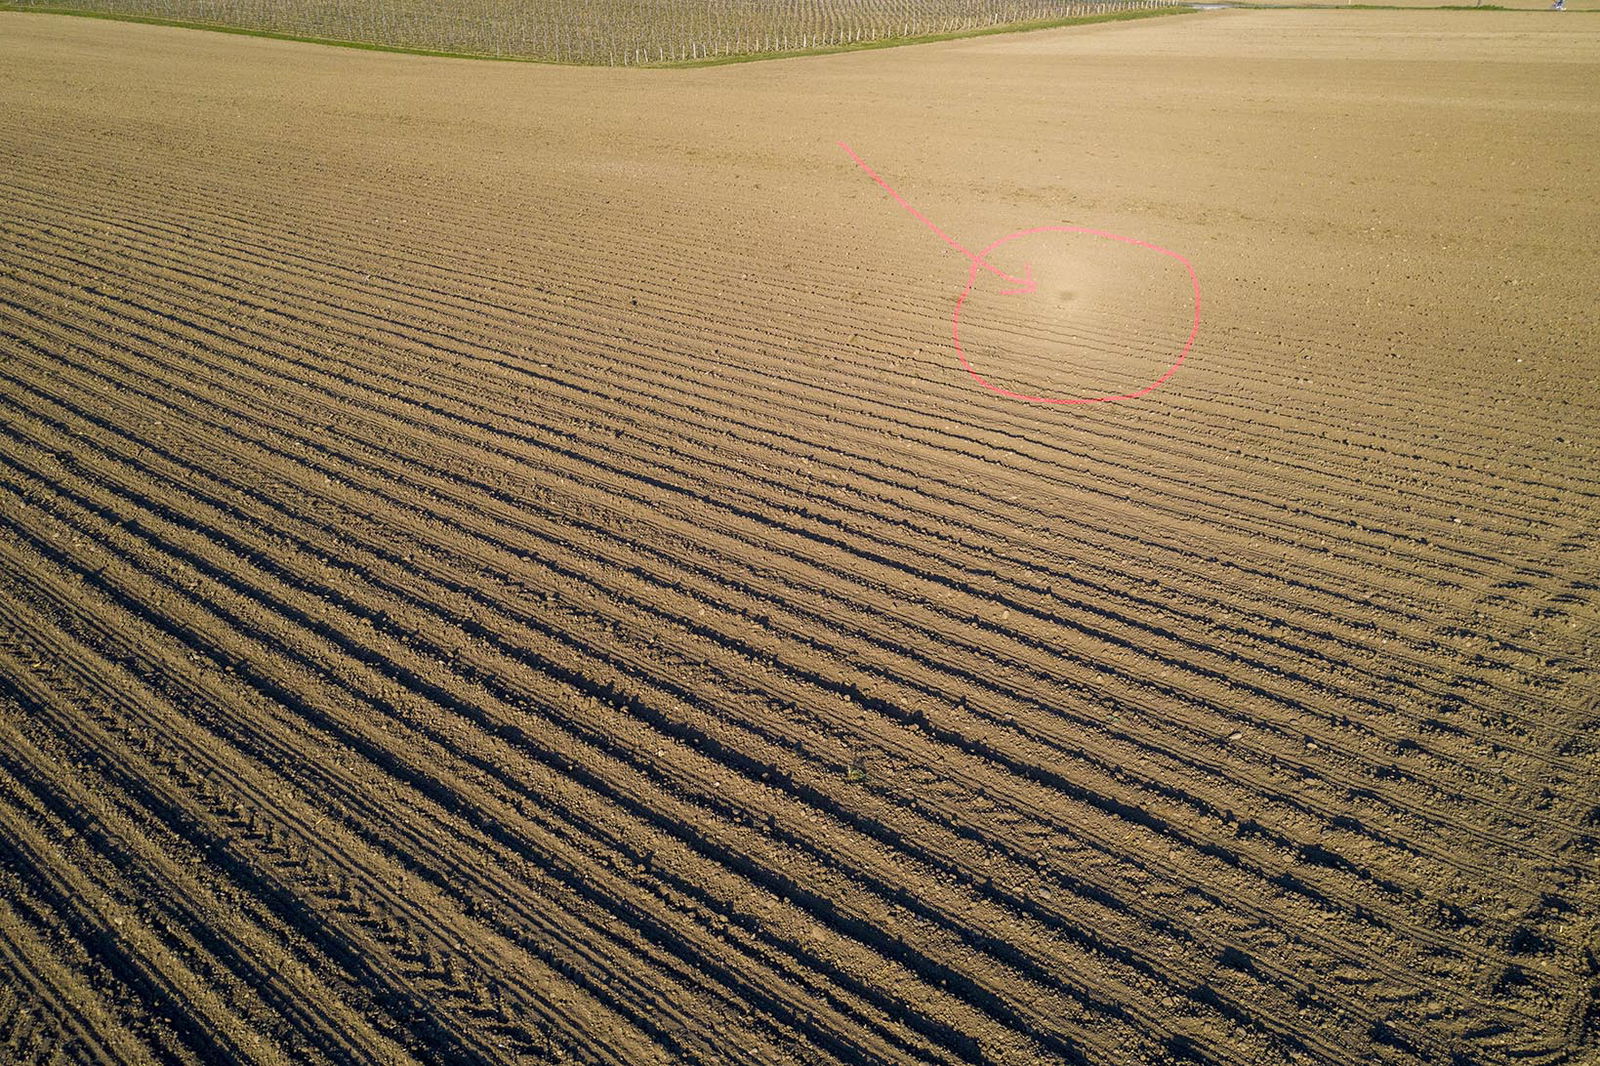
Heiligenshein Effect
The Heiligenschein, or “halo” effect, manifests as a luminous halo around a drone’s shadow, most visible when the drone flies over dewy or moist surfaces with the sun positioned low in the sky. This optical effect occurs because the moisture enhances light reflection directly back towards its source. To avoid capturing this effect during drone shoots, aim to film during times when the sun is higher, minimizing shadow visibility. Additionally, choose dry days or surfaces to reduce the likelihood of this phenomenon affecting your footage.
Post-Production Techniques for Drone Footage
The magic of drone cinematography doesn’t end when you land your drone. Post-production plays a crucial role in refining and enhancing your aerial footage to achieve a truly cinematic result.
Color Grading
Color grading is essential for giving your aerial footage a professional, cinematic look. Start by using a LUT (Look-Up Table) designed for your cameras logarithmic encoding (e.g D-Log) to quickly achieve a base look. For specific moods or styles, adjust the basic parameters like exposure, contrast, and saturation. Pay special attention to the sky, which often requires separate adjustments to maintain detail in clouds.
For landscape shots, enhance the natural colors of vegetation and water bodies. In urban environments, focus on bringing out architectural details. Experiment with split-toning to add depth to your images. Remember that subtle adjustments often yield the most natural-looking results. Always color grade on a calibrated monitor to ensure accuracy, and consider the final viewing platform (e.g., mobile devices, TV screens) when making your adjustments.
Stabilization
Even with the best gimbal systems, drone footage can sometimes benefit from additional stabilization in post-production. Use software like Adobe After Effects or DaVinci Resolve to apply advanced stabilization algorithms. Warp stabiliser in Premiere Pro can be particularly effective for drone footage. For hyperlapse sequences, consider using software like Microsoft Hyperlapse. When stabilizing, be mindful of any distortion introduced, especially around the edges of the frame.
Sometimes, a slight crop can help remove wavering edges. For shots with extreme movement, consider using motion tracking to stabilise specific elements in the frame. Always compare your stabilised footage with the original to ensure you’re not losing important motion or introducing artefacts. Remember that over-stabilization can make footage look unnaturally smooth, so aim for a balance that maintains the dynamic feel of aerial cinematography.
Legal and Ethical Considerations
Operating a drone for cinematography comes with significant legal and ethical responsibilities. Understanding and adhering to regulations and best practices is crucial for the sustainability of our craft.
CASA Regulations Compliance
Adhering to CASA (Civil Aviation Safety Authority) regulations is crucial for legal and safe drone operations in Australia. Familiarise yourself with the latest CASA guidelines, which cover aspects like drone registration, pilot certification, and operational limitations. Ensure you have the appropriate licenses for your type of drone and intended use. Be aware of restricted airspace and no-fly zones, using apps like OpenSky to check your flight area.
Maintain visual line of sight unless you have specific EVLOS (Extended Visual Line of Sight) approval. Respect privacy and property rights when planning your shots. Keep detailed flight logs and maintenance records as required by CASA. Stay informed about changes in regulations, as drone laws are continually evolving. Consider joining professional associations for drone operators to stay updated on regulatory changes and best practices.
Privacy and Consent
Respecting privacy is essential in drone cinematography. Always obtain necessary permissions before filming private property or events. In public spaces, be mindful of capturing individuals who haven’t consented to be filmed. For commercial projects, secure location approvals and model releases as needed. When filming in residential areas, consider notifying neighbors about your planned drone operations. Avoid capturing sensitive locations like military installations or critical infrastructure without proper authorization.
Be particularly cautious when filming near schools or areas where children are present. If your footage inadvertently captures private moments or sensitive information, edit or blur these sections before publication. Understand local privacy laws, which may vary depending on your location. Always prioritize ethical considerations over getting a shot, maintaining public trust in drone operators.
Environmental Impact
Drone operators have a responsibility to minimize their environmental impact. Avoid disturbing wildlife, especially during breeding seasons or in sensitive habitats. Maintain a safe distance from birds and animals to prevent stress or altered behavior. Be cautious in fragile ecosystems like wetlands or coral reefs. Consider the noise pollution from your drone, particularly in quiet natural areas. Follow “leave no trace” principles, ensuring you don’t damage vegetation or disturb the landscape during takeoff and landing. In national parks or protected areas, check for specific drone regulations, as many restrict or prohibit drone use.
Use your platform responsibly to document environmental issues without causing harm. If filming for conservation purposes, work with local authorities and environmental experts to ensure your activities support rather than hinder protection efforts. Remember, capturing beautiful natural footage comes with the responsibility of preserving the environments we film.
Conclusion
Capturing cinematic drone shots is a journey that combines technical skill, creative vision, and responsible operation. From understanding the capabilities of your equipment to perfecting advanced flying techniques, each aspect contributes to creating compelling aerial cinematography. Remember that the most stunning drone footage often comes from careful planning and a deep appreciation for the landscapes and subjects you’re capturing. As you develop your skills, continue to push the boundaries of what’s possible with drone videography, always balancing creativity with safety and ethical considerations.
Stay current with evolving technologies and regulations in the drone industry. Whether you’re a hobbyist or a professional filmmaker, the unique perspective offered by drones provides endless opportunities to tell stories and showcase the world from above. With practice, patience, and a commitment to excellence, you’ll be well-equipped to create breathtaking aerial footage that captivates audiences and brings new dimensions to visual storytelling.
CASA Drone Weight Categories and Requirements
There are specific categories for drones and remotely piloted aircraft (RPA) which determine the activities or operation you can conduct. This depends on:
- activity and location
- weight of the RPA
- qualifications, accreditation/licence and certification required to conduct the activity.
Your drone will fall into one of the below drone weight classifications:
- micro: 250 g or less
- very small: more than 250 g, but not more than 2 kg
- small: more than 2 kg, but not more than 25 kg
- medium: more than 25 kg, but not more than 150 kg
- large: more than 150 kg.
If you fly without the appropriate operator accreditation or an unregistered RPA, penalties will apply.
Depending on the weight of your drone, you may need to have a qualification or accreditation. See the following categories to learn more.
Micro RPA (Sub 250g)
You can fly a micro drone or RPA that weighs 250g or less for business or as part of your job. You do not need a RePL or remotely piloted aircraft operator’s certificate (ReOC).
Very small, excluded category RPA (Sub 2kg)
You can fly a very small drone or RPA that weighs 2 kg or less for business or as part of your job. This is also called the sub-2 kg excluded category because you do not need a RePL or ReOC.
Examples of businesses that fly under this excluded category may include:
- photographers and film makers
- real estate agents
- researchers
- construction workers and tradespeople
- government and community service providers.
Small, excluded category RPA (Sub 25kg)
You can fly a small drone or RPA that weighs more than 2 kg but not more than 25 kg over your own land for business or as part of your job, provided you do not accept any type of payment for the services. This is called the landowner or private landholder excluded category because you don’t need a RePL or ReOC.
Examples of the types of operations you can do under this excluded category include:
- aerial spotting
- crop, livestock or equipment inspections
- land surveying
- agricultural operations
- carrying cargo.
Medium, excluded category RPA (Sub 150kg)
You can fly a medium drone or RPA that weighs more than 25 kg but not more than 150 kg over your own land for business or as part of your job, provided you do not accept any type of payment for the services. This is called the landowner or private landholder excluded category. You must get an RePL for the type and model of drone you want to fly. Find out how to get your RePL.
Drone Safety Rules
here are rules in place to keep you and others safe, on the ground and in the air.
The drone safety rules, also known as the standard operating conditions, apply to all types of drones and remote-controlled aircraft.
The dos and don’ts of flying
You must:
- only fly one drone at a time
- always fly your drone in visual line-of-sight — this means:
- flying only during the day
- avoid flying through cloud, fog or smoke
- you can always see your drone with your own eyes — not by using goggles, binoculars or another device
- not flying behind obstacles that stop you from always seeing your drone. For example, trees, buildings or other structures.
You must not fly your drone:
- higher than 120 m (400 ft) above ground level — that’s about the height of a 35-storey building or length of a football field
- closer than 30 m to people — other than those helping to control or navigate your drone
- over or above people at any time or height — a crowded beach, busy road, sporting event, concert or wedding are all populous areas
- in a way that creates a hazard to another person, property or aircraft
- near emergency operations
- in prohibited or restricted airspace (use a CASA-verified drone safety app to help you)
- closer than 5.5 km to a controlled airport, which usually has a control tower, if your drone weighs more than 250 g. You can operate indoors provided the drone can’t get out of the building. If you’re a ReOC holder, please see more information on flight authorisations.
You may operate your drone within 5.5 km of a non-controlled airport or helicopter landing site if:
- there are no crewed aircraft flying in the area
- you see any crewed aircraft flying to or from the airport or helicopter landing site you land as soon as safely possible
- you stay outside the airfield boundary.
In addition to the drone safety rules, different states also have rules about drone use. Before you fly, check any state or territory laws
How can I enhance the quality of my drone videos?
To elevate your drone footage to cinematic quality, focus on the following techniques:
Smooth movements: Execute slow, deliberate movements with your drone. Gradual acceleration and deceleration are key to achieving a professional look. Utilize intelligent flight modes like DJI’s Cinematic Mode, which softens stick movements for smoother footage.
Plan your shots: Before taking off, visualize your desired shots and plan your flight path. This pre-planning helps avoid erratic movements and ensures you capture all necessary footage.
Use ND filters: Neutral Density filters allow you to maintain a cinematic shutter speed (typically 1/50 or 1/60 for 24fps or 30fps footage respectively) in bright conditions, reducing motion blur and creating a more filmic look.
Adjust camera settings: Shoot in a flat color profile like D-Log for greater flexibility in post-production color grading. If your drone allows, shoot in 10-bit color for better color depth.
Maintain consistent altitude: For tracking shots, try to keep a consistent altitude to avoid distracting vertical movements.
Utilize automated flight modes: Features like Point of Interest, Waypoints, or Cable Cam can help create perfectly smooth and repeatable movements.
Post-production stabilization: Use software stabilization in your editing program to further smooth out any minor shakes or vibrations.
Edit thoughtfully: In post-production, use longer cuts and smooth transitions to maintain the flow of your aerial footage.
Remember, practice is crucial. The more you fly and experiment with different techniques, the better your footage will become.
When is the ideal time to film with a drone for the best lighting?
The golden hours – shortly after sunrise and just before sunset – are indeed prime times for drone cinematography, but there are other considerations and options:
Golden Hour: This period, typically the first hour after sunrise and the last hour before sunset, provides soft, warm light that adds a magical quality to landscapes and architecture. The long shadows create depth and texture in your shots.
Blue Hour: The brief period just before sunrise or just after sunset when the sky takes on a deep blue hue can be excellent for city shots, especially when artificial lights are starting to come on.
Midday: While often avoided due to harsh shadows, midday sun can be great for:Minimalist shots where strong shadows are desired
Aerial shots of water bodies, as the sun’s reflection can create stunning effects
Top-down shots where shadows are less of an issue
Overcast days: Cloudy conditions provide soft, diffused light that can be ideal for even exposure across landscapes or for highlighting textures.
Dynamic weather: Stormy conditions or partially cloudy skies can create dramatic lighting effects and add mood to your footage.
Night filming: With proper permits and a drone equipped with low-light capabilities, night shots of cityscapes or events can be spectacular.
When planning your shoot, consider:
– The direction of light in relation to your subject
– How the light interacts with the landscape or architecture you’re filming
– The mood you want to convey in your footage
Always check local regulations regarding drone flight times, as some areas restrict flying during early morning or late evening hours.
Ultimately, the best time to film depends on your specific subject and the atmosphere you want to create in your footage. Experimenting with different lighting conditions will help you develop a strong sense of what works best for various subjects and moods in your drone cinematography.
What essential equipment do I need to get started with professional drone cinematography?
To begin your journey in professional drone cinematography, you’ll need a capable drone like the DJI Inspire 3 or DJI Mavic 3 Pro Cine for high-end work or the DJI Mini 3 Pro for portability. Essential accessories include ND filters for exposure control, extra batteries, and a robust carrying case. For better control and monitoring, use a tablet or a dedicated drone monitor like the DJI CrystalSky. Invest in fast, high-quality SD cards for smooth recording of high-resolution footage. For post-production, you’ll need a powerful laptop capable of handling 4K video editing. Don’t forget safety equipment such as propeller guards for indoor flights and a landing pad for rough terrain. As you progress, you may want to expand your kit with specialized equipment based on your specific cinematography needs.
What training and certifications do I need to become a professional drone cinematographer in Australia?
In Australia, you’ll need a Remote Pilot Licence (RePL) for commercial drone operations, which you can obtain through CASA-approved training courses. These courses typically cover both hands-on flight training and essential theoretical knowledge. To enhance your cinematography skills, consider online courses from platforms like Udemy or Skillshare, which offer instruction on drone cinematography techniques and post-production. For advanced skills, look into workshops or masterclasses led by experienced drone cinematographers. If you’re interested in specialized applications like aerial mapping or infrared imaging, seek out targeted training programs. Joining professional organizations like the Australian Association for Unmanned Systems (AAUS) can provide valuable resources and keep you updated on industry developments. Remember, in this rapidly evolving field, continuous learning and skill development are crucial for staying competitive.
How can I connect with other drone enthusiasts and professionals to grow my skills and opportunities in drone cinematography
Joining drone communities can significantly enhance your growth as a cinematographer. Look for local drone user groups or meetups where you can share experiences and learn from others. Online forums like DJI Forums or Reddit’s /r/drones are excellent resources for troubleshooting and staying updated on industry news. Participate in drone film festivals or competitions to showcase your work and connect with other creators. Social media platforms, especially Instagram and YouTube, can be powerful tools for sharing your footage and connecting with potential clients or collaborators. Consider joining professional organizations like the Australian Cinematographers Society (ACS) for networking with filmmakers beyond the drone niche. Attend industry conferences and expos to stay abreast of the latest technology and techniques. Collaborating with other drone operators on projects can also expand your skills and professional network. Remember, the drone community is often supportive and collaborative, so don’t hesitate to reach out and engage with fellow enthusiasts and professionals.